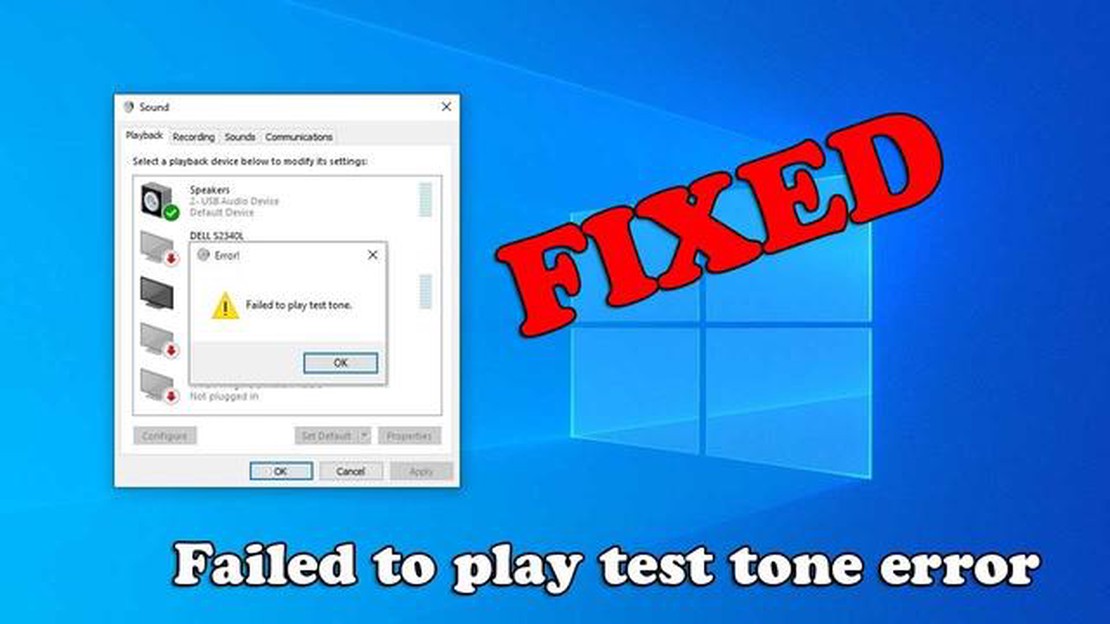
How To Fix “Failed to play test tone” Error on Windows 10
If you’re a Windows 10 user and have encountered the “Failed to play test tone” error, you’re not alone. This frustrating error often occurs when you try to play a sound or test the sound settings on your computer. Fortunately, there are several steps you can take to fix this issue and get your sound working again. In this step-by-step guide, we’ll walk you through the troubleshooting process and help you resolve the “Failed to play test tone” error on Windows 10.
Step 1: Restart Your Windows Audio Service
Table Of Contents
The first thing you should try is restarting the Windows Audio service. This service is responsible for managing audio devices and their associated drivers. To restart the service, follow these steps:
1. Press the Windows key + R to open the Run dialog box.
Type “services.msc” and press Enter to open the Services window.
Scroll down and find the “Windows Audio” service.
Right-click on the service and select “Restart”.
Wait for the service to restart and then close the Services window.
Step 2: Update Your Audio Drivers
Outdated or incompatible audio drivers can often cause the “Failed to play test tone” error. To update your audio drivers, follow these steps:
1. Press the Windows key + X and select “Device Manager” from the menu.
Expand the “Sound, video and game controllers” category.
Right-click on your audio device and select “Update driver”.
Choose the option to search automatically for updated driver software.
Wait for Windows to search for and install the latest driver.
It’s important to note that if Windows is unable to find a driver update, you may need to visit the manufacturer’s website and manually download and install the latest driver for your specific audio device.
Step 3: Run the Windows Audio Troubleshooter
If the above steps didn’t resolve the error, you can try running the Windows Audio Troubleshooter. This built-in tool can automatically detect and fix common audio issues. To run the troubleshooter, follow these steps:
1. Press the Windows key + I to open the Settings app.
3. Click on the “Playing Audio” option and then click “Run the troubleshooter”.
4. Follow the on-screen instructions to complete the troubleshooting process.
By following these steps, you should be able to fix the “Failed to play test tone” error on Windows 10 and get your sound working again. If none of the above solutions work, you may need to consider reinstalling your operating system or contacting technical support for further assistance.
How To Fix “Failed to play test tone” Error on Windows 10
If you are encountering the “Failed to play test tone” error on Windows 10, you may be unable to hear any sound from your speakers or headphones. This issue can occur due to various reasons, including driver conflicts, incorrect audio settings, or outdated drivers. Fortunately, there are several steps you can take to fix this error.
Step 1: Restart your computer
Before proceeding with any troubleshooting steps, it’s recommended to restart your computer. Sometimes, a simple restart can resolve minor software glitches and fix the “Failed to play test tone” error.
Step 2: Check audio cable connections
Ensure that all audio cables are securely connected to your computer and the audio device. Loose or faulty connections can result in the “Failed to play test tone” error. Try unplugging and reconnecting all audio cables to ensure they are properly seated.
Step 3: Update audio drivers
Press Windows + X and select Device Manager from the menu.
Expand the “Sound, video and game controllers” category.
Right-click on your audio device and select Update driver.
Choose the option to automatically search for updated driver software.
If Windows detects any updates, follow the on-screen instructions to install them.
Step 4: Enable and restart Windows Audio service
Press Windows + R to open the Run dialog box.
Type “services.msc” and press Enter.
In the Services window, locate and double-click on the “Windows Audio” service.
Set the Startup type to Automatic and click on Start.
Click Apply and then OK.
Restart your computer and check if the “Failed to play test tone” error is resolved.
Step 5: Use the Audio Troubleshooter
Windows 10 includes a built-in Audio Troubleshooter that can automatically detect and fix common audio issues. To use the Audio Troubleshooter:
Click on the Start button and select Settings (gear icon).
Go to System > Sound.
Scroll down and click on “Troubleshoot” under the “Sound” section.
Follow the on-screen instructions to run the Audio Troubleshooter.
Restart your computer and check if the error is resolved.
Step 6: Reinstall audio drivers
If the above steps did not fix the “Failed to play test tone” error, you may need to reinstall the audio drivers. To reinstall audio drivers:
Press Windows + X and select Device Manager.
Expand the “Sound, video and game controllers” category.
Right-click on your audio device and select Uninstall device.
Restart your computer.
After restarting, Windows will automatically reinstall the audio drivers.
Check if the error is resolved.
If none of the above steps resolve the “Failed to play test tone” error, you may need to seek further assistance from a professional technician or contact the manufacturer of your audio device for support.
Step-by-Step Guide
To fix the “Failed to play test tone” error on Windows 10, follow these steps:
Restart your computer: Sometimes, a simple restart can resolve the issue. Restart your computer and check if the error is gone.
Check sound settings: Ensure that your sound settings are properly configured. Right-click on the sound icon in the taskbar and select “Open Sound settings.” In the Sound settings window, check if the correct output device is selected. Also, click on “Sound control panel” to open the Sound Control Panel and verify the default playback device.
Update audio drivers: Outdated or incompatible audio drivers can cause the “Failed to play test tone” error. Update your audio drivers by right-clicking on the Start menu and selecting “Device Manager.” Expand the “Sound, video, and game controllers” category, right-click on your audio device, and select “Update driver.” Choose the option to search for updated drivers automatically and follow the on-screen instructions.
Disable audio enhancements: Audio enhancements can sometimes conflict with the system and lead to the error. To disable audio enhancements, right-click on the sound icon in the taskbar and select “Open Sound settings.” Scroll down to the “Advanced sound options” section and click on “App volume and device preferences.” Under the “Output” section, click on the dropdown arrow and select “None” for the app you’re experiencing issues with.
Restart Windows Audio service: The Windows Audio service handles audio-related operations on your computer. Restarting this service can help resolve the error. Open the Run dialog by pressing Windows + R, type “services.msc,” and press Enter. In the Services window, scroll down and find “Windows Audio.” Right-click on it and select “Restart.”
Run the Audio Troubleshooter: Windows 10 has a built-in Audio Troubleshooter that can automatically detect and fix audio-related issues. To run the Audio Troubleshooter, right-click on the sound icon in the taskbar and select “Troubleshoot sound problems.” Follow the on-screen instructions and let Windows attempt to fix the problem for you.
Reset audio settings: If none of the above solutions work, you can try resetting your audio settings. Open the Run dialog by pressing Windows + R, type “control panel,” and press Enter. In the Control Panel window, select “Hardware and Sound,” then click on “Sound.” In the Sound window, go to the Playback tab, select your default playback device, and click on the “Properties” button. Go to the “Advanced” tab and click on the “Restore Defaults” button. Confirm the action and click OK. Restart your computer after resetting the audio settings.
If none of these solutions fix the “Failed to play test tone” error, consider seeking further assistance from Microsoft support or contacting your device manufacturer for help.
Windows 10 Audio Troubleshooting
If you are encountering the “Failed to play test tone” error on Windows 10, you may be experiencing audio playback issues. This error can occur when there is a problem with your audio drivers or settings. Fortunately, there are several troubleshooting steps you can take to resolve this issue.
Potential Solutions
Restart your computer: Sometimes a simple restart can resolve temporary software glitches that may be causing the error.
Check audio settings: Ensure that your audio output is set to the correct device. To do this, right-click on the volume icon in the taskbar and select “Playback devices.” From there, select the appropriate audio device and click “Set as Default.”
Update audio drivers: Outdated or incompatible audio drivers can cause audio playback issues. To update your drivers, open the Device Manager by right-clicking on the Start button and selecting “Device Manager.” Expand the “Sound, video, and game controllers” section, right-click on your audio device, and select “Update driver.” Follow the on-screen instructions to complete the update.
Uninstall and reinstall audio drivers: If updating the drivers does not resolve the issue, you may need to uninstall and reinstall them. In the Device Manager, right-click on your audio device and select “Uninstall device.” Restart your computer, and Windows will automatically reinstall the drivers.
Run the Audio Troubleshooter: Windows 10 comes with a built-in Audio Troubleshooter that can help diagnose and fix audio issues. To access it, go to Settings > Update & Security > Troubleshoot > Playing Audio. Click on “Run the troubleshooter” and follow the prompts.
Disable audio enhancements: Some audio enhancements or effects may conflict with certain hardware configurations, causing the “Failed to play test tone” error. To disable these enhancements, right-click on the volume icon in the taskbar and select “Playback devices.” Double-click on your audio device, go to the Enhancements tab, and check “Disable all enhancements.”
Check for Windows updates: Keeping your operating system up to date can help resolve compatibility issues with audio drivers. Go to Settings > Update & Security > Windows Update and click on “Check for updates.” Install any available updates and restart your computer if prompted.
Reset Windows audio service: Resetting the Windows Audio service can help fix audio-related problems. Open the Run dialog by pressing Windows + R, then type “services.msc” and press Enter. In the Services window, locate “Windows Audio” and right-click on it. Select “Restart” from the context menu. Repeat this process for the “Windows Audio Endpoint Builder” service.
Perform a system restore: If all else fails, you can try performing a system restore to revert your computer’s settings to a previous state when audio was working correctly. To do this, type “restore” in the Windows search bar and select “Create a restore point.” In the System Properties window, click on “System Restore” and follow the on-screen instructions.
By following these troubleshooting steps, you should be able to resolve the “Failed to play test tone” error on Windows 10 and restore proper audio playback functionality.
FAQ:
What does the “Failed to play test tone” error mean?
The “Failed to play test tone” error is an audio-related issue that occurs in Windows 10 when the system is unable to play the test tone sound during the troubleshooting process.
Why am I getting the “Failed to play test tone” error on my Windows 10?
There are several possible reasons for this error, including incorrect audio settings, faulty audio drivers, conflicts with other software, or issues with the audio hardware itself.
How can I fix the “Failed to play test tone” error on Windows 10?
To fix this error, you can try several troubleshooting steps, including checking audio settings, updating audio drivers, disabling enhancements, performing a system restore, or updating Windows.
Is there a specific order in which I should try the solutions to fix the “Failed to play test tone” error?
There is no specific order to try the solutions. You can start by checking the audio settings and updating the audio drivers. If those don’t work, you can proceed to try the other solutions one by one until the error is resolved.
What should I do if none of the solutions mentioned in the article fix the “Failed to play test tone” error?
If none of the solutions mentioned in the article fix the error, you can try contacting Microsoft support for further assistance. They may be able to provide additional troubleshooting steps or recommend other solutions to fix the problem.
How To Fix Amazon Prime Video Stuck On Loading Screen Are you frustrated with your Amazon Prime Video constantly getting stuck on the loading screen? …
Tips for beginners on rainbow 6: siege. Rainbow Six: Siege is a tactical first-person shooter developed by Ubisoft that offers a unique gameplay and a …
How To Change Your Display Name In COD Vanguard | Easy Steps (Updated 2023) Are you tired of your old display name in Call of Duty: Vanguard and want …
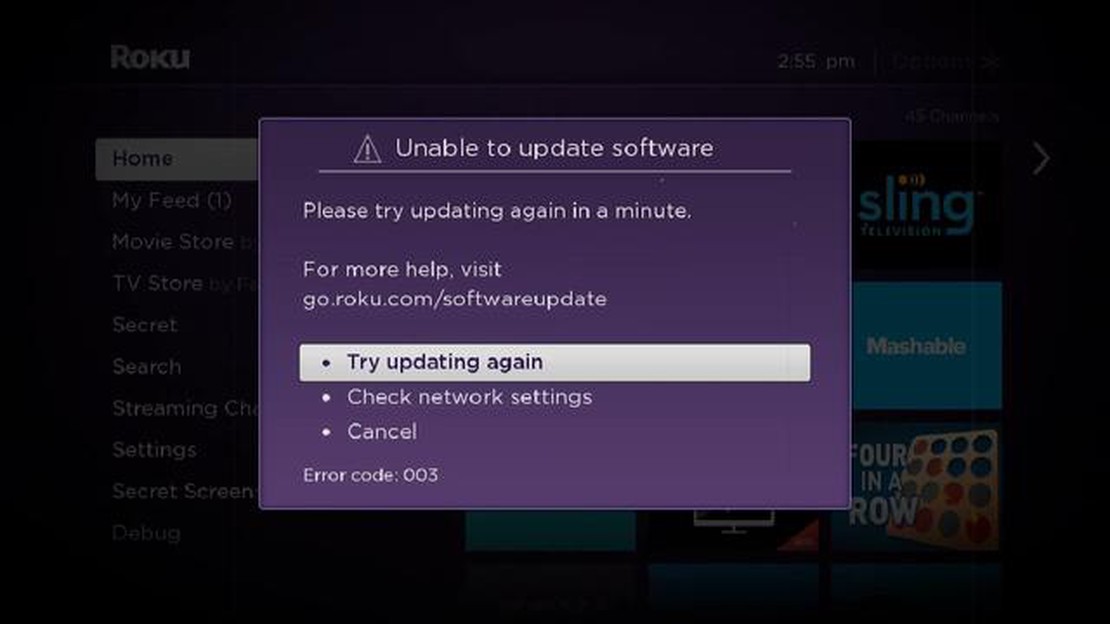
How To Fix Roku Error Code 003 Issue Quick and Easy Way If you’re a Roku user, you may have encountered the dreaded Error Code 003 at some point. This …