

How To Get Verified On Xbox - A Step-by-Step Guide
How To Get Verified On Xbox If you’re an avid gamer on Xbox, you may have come across other players with a “Verified” badge next to their username. …
Read Article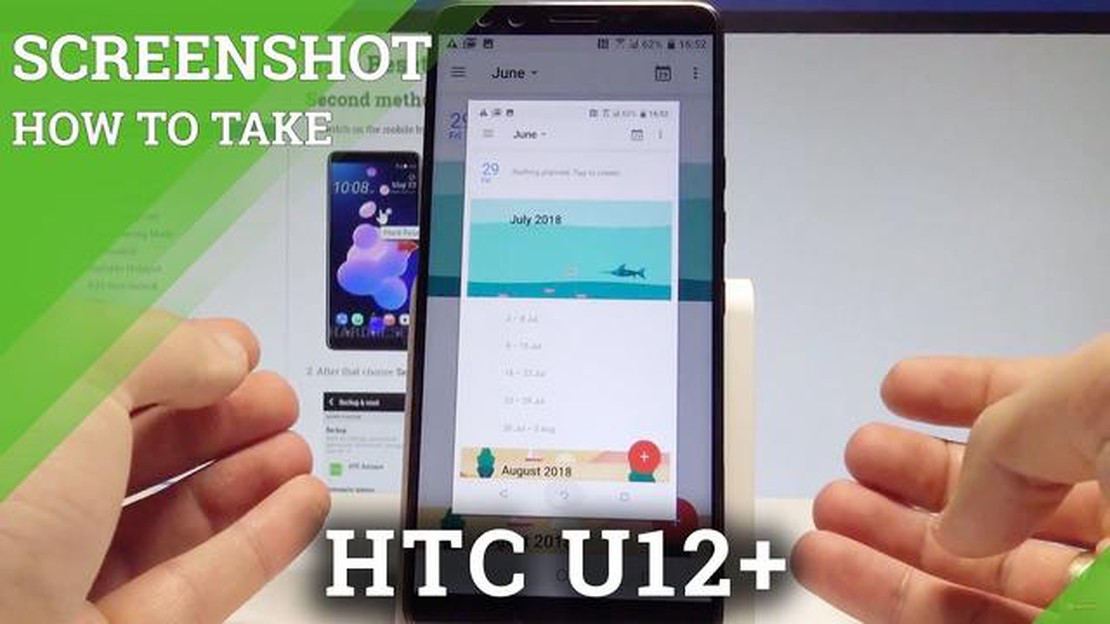
If you own an HTC U12 Plus (HTC U12+), you may find it useful to take screenshots to capture important information or share interesting content with others. However, if you’re new to the device or not familiar with the process, you may be wondering how to take a screenshot on your HTC U12 Plus.
In this step-by-step guide, we will walk you through the process of taking a screenshot on your HTC U12 Plus (HTC U12+). Whether you want to capture a specific conversation, save a funny meme, or capture a high score in a game, this guide will show you how to do it effortlessly.
With the HTC U12 Plus, you have two easy methods to take a screenshot - using physical buttons or using HTC’s Edge Sense feature. We will cover both methods, so you can choose the one that suits you the best.
Taking screenshots on your HTC U12 Plus is a straightforward process. Follow these simple steps to capture and save screenshots on your device.
That’s it! You have successfully taken a screenshot on your HTC U12 Plus. Remember, the Power and Volume Down buttons must be pressed simultaneously for the screenshot to be captured.
Before you start taking screenshots on your HTC U12 Plus, there are a few things you need to do to ensure everything is set up correctly:
Once you have completed these initial setup steps, you are ready to proceed with taking screenshots on your HTC U12 Plus.
HTC U12 Plus is a great smartphone with impressive features, and one of those features is the ability to capture screenshots. Whether you want to save important information, share a funny conversation, or capture a beautiful moment, taking screenshots on HTC U12 Plus is quick and easy.
To capture a screenshot on HTC U12 Plus, you can use the hardware buttons or the gesture-based method. Here are the step-by-step instructions for both methods:
Now you know two easy methods to capture screenshots on HTC U12 Plus. Whether you prefer using the hardware buttons or the gesture-based method, capturing a screenshot is a quick and convenient way to save and share information or moments on your HTC U12 Plus.
After taking a screenshot on your HTC U12 Plus, you may want to manage and share the captured images. Here are some options for managing and sharing your screenshots:
1. Viewing Screenshots
To view your screenshots, go to the gallery app on your HTC U12 Plus. The screenshots will be saved in a specific folder or album, usually named “Screenshots” or “Pictures.”
2. Editing Screenshots
Read Also: How to work with snap layouts and snap groups in Windows 11: A detailed guide
If you want to make some changes or edits to your screenshots before sharing them, you can use the built-in photo editor on your HTC U12 Plus. This editor will allow you to crop, rotate, or add filters to your screenshots.
3. Sharing Screenshots via Messaging Apps
You can easily share your screenshots with friends and family by using messaging apps. Open the messaging app of your choice, create a new message, and attach the screenshot file from the gallery app.
4. Sharing Screenshots via Social Media
Read Also: How to become invisible on Facebook: useful tips and instructions
To share your screenshots on social media platforms like Facebook, Twitter, or Instagram, open the respective app, create a new post, and attach the screenshot file from the gallery app. Use the app’s built-in features to add captions, hashtags, or mention relevant people.
5. Sharing Screenshots via Cloud Storage
If you want to share your screenshots with someone who doesn’t have immediate access to their phone, you can upload the screenshots to cloud storage services like Google Drive or Dropbox. Once uploaded, you can generate a shareable link and send it to the recipient.
6. Transferring Screenshots to a Computer
If you prefer managing your screenshots on a computer, you can transfer them from your HTC U12 Plus to your computer via USB connection. Connect your phone to the computer using a USB cable, choose the File Transfer option, and navigate to the screenshot folder to copy the files.
7. Deleting Screenshots
To free up space on your HTC U12 Plus, you can delete unwanted screenshots. Open the gallery app, select the screenshots you want to delete, and tap the delete button. Alternatively, you can also use a file manager app to locate and delete the screenshots.
By following these steps, you can easily manage and share your screenshots taken on your HTC U12 Plus.
To take a screenshot on your HTC U12 Plus, press the power button and the volume down button at the same time. Hold them for a couple of seconds until you see the screenshot animation and hear the camera shutter sound.
Yes, you can also use the Edge Sense feature on the HTC U12 Plus to take a screenshot. Simply squeeze the sides of the phone to activate Edge Sense, then customize the squeeze gesture to capture a screenshot.
After taking a screenshot on your HTC U12 Plus, you can find it in the “Screenshots” folder in your phone’s gallery. You can also access the screenshots by going to the Photos app and looking for the Screenshots album.
Yes, you can edit and annotate your screenshots on the HTC U12 Plus. After taking a screenshot, you can immediately tap on the notification that appears to open the screenshot in the Markup editor. This editor allows you to crop, draw, write, and add stickers to your screenshots.
Yes, you can take a scrolling screenshot on the HTC U12 Plus. After taking a regular screenshot, you will see a thumbnail of the screenshot at the bottom of the screen. Tap on the thumbnail, then select “Scrolling screenshot” from the options menu. You can then capture a longer screenshot of a webpage or document by scrolling through it.
How To Get Verified On Xbox If you’re an avid gamer on Xbox, you may have come across other players with a “Verified” badge next to their username. …
Read Article
Gog galaxy 2.0, one library that will rule all, open beta started GOG has announced the launch of the open beta of GOG Galaxy 2.0, a universal game …
Read Article
Here’s how to set dark mode on iphone You may have noticed that more and more people are starting to use dark mode on their devices. Dark mode, also …
Read Article
Google Project Fi vs T-Mobile Unlimited Data Plan When it comes to choosing a mobile phone plan, there are countless options to consider. Two popular …
Read Article
5 Best SNES Emulators For Android in 2023 Are you a fan of old-school video games and miss the nostalgic charm of playing your favorite Super Nintendo …
Read Article
How to sync Fitbit Versa to Android The Fitbit Versa is a popular fitness tracker that allows users to monitor their health and track their activity …
Read Article


