
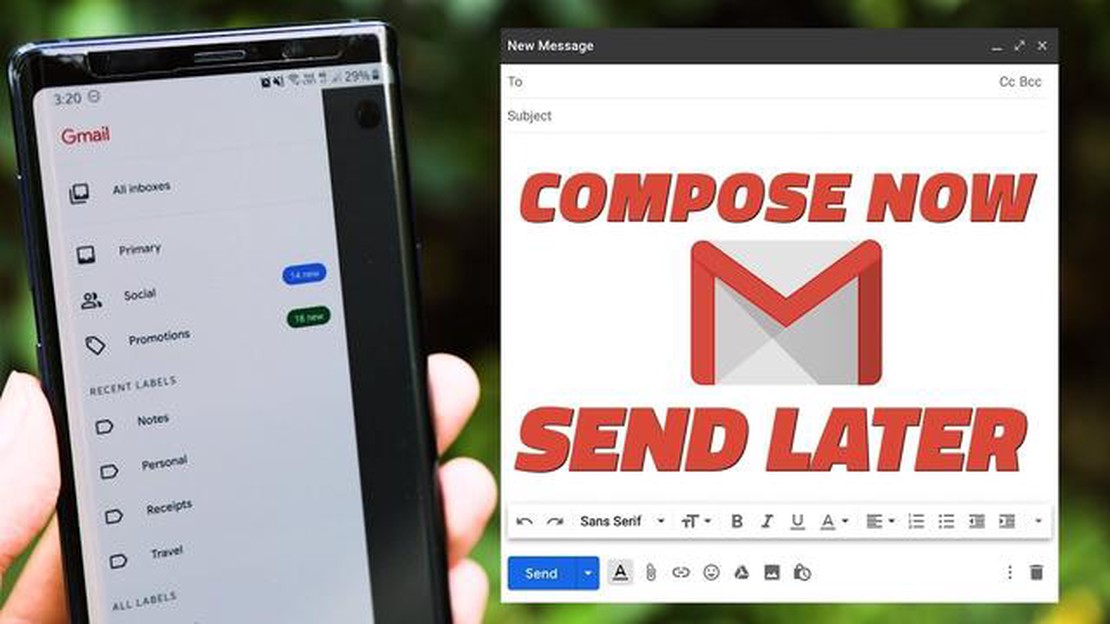

How to schedule email in Gmail on Android and iPhone: step-by-step instructions
Steps to schedule emails for gmail in android and iphone. One of the most popular email services is Gmail, which offers a wide range of …
Read Article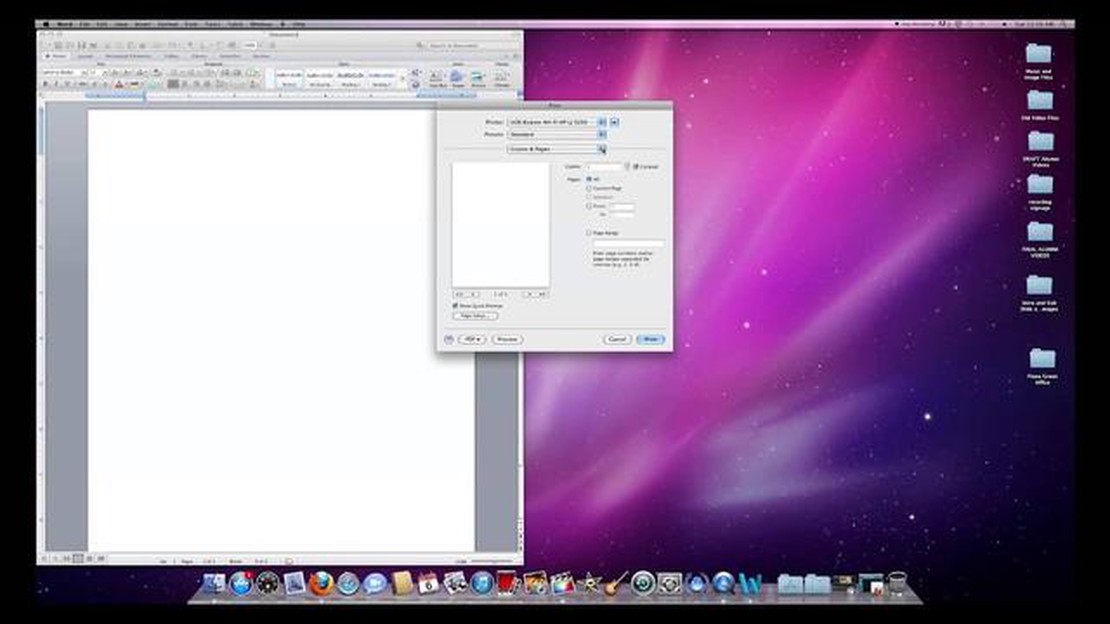
Setting up duplex printing is a useful feature that saves paper and makes it easier to print large documents. If you have a Mac computer, you can easily set up duplex printing using the built-in tools of your operating system. Setting up this feature is easy and only takes a few minutes.
Step 1: Open the print menu
Before you begin the process, make sure your printer is connected to your Mac and turned on. Then, open the document you want to print and select “File” from the top menu bar. From the drop-down menu, select “Print” or simply press the Command + P key combination.
Step 2: Open Print Options
After opening the print menu, you will see a panel with print options. There are several tabs at the top of the panel with a list of available options. To set up duplex printing, you will need to open the Advanced Settings tab.
Step 3: Enable Duplex Printing
Inside the Advanced Settings tab, you will find various printing options. Look for the “Duplex Printing” or “Print on both sides” option and set it to “Enabled” or “Automatic”. Depending on the type of printer and its drivers, the name and location of this option may vary slightly.
Note: If you cannot find the duplex option, make sure your printer supports this feature. If your printer does not support two-sided printing, you can use your printer software or other tools for two-sided printing.
Step 4: Configure other printing settings (optional)
After enabling duplex printing, you can also customize other print settings such as paper size, orientation, and print quality. You can change these settings by using the “Layout and Scaling” or “Advanced Print Settings” tab. If necessary, you can customize these settings according to your requirements and preferences.
When you are done customizing the print settings, click on the “Print” or “OK” button to start the printing process with the selected settings. Now your Mac will print your document on both sides, saving paper and making the printing process more efficient.
Duplex printing is a useful feature to save paper and simplify the printing process on your Mac. In this article, we’ll show you how to set up duplex printing on your device.
After following these steps, your document will be printed with double-sided printing. There are some things to keep in mind when using this feature:
Now you know how to set up duplex printing on your Mac. This feature can be useful when printing large documents or presentations, and it can also help you save resources.
Read Also: How to View or Check New Updates on Samsung Galaxy S21 | [Website Name]
Before you can set up duplex printing on Mac, you need to open the print section in your operating system settings. To do so, follow the instructions below:
Once you have completed these steps, you will be in the print settings section of the selected printer where you can continue setting up duplex printing.
Once you have installed the correct drivers for your printer, proceed to the next step - selecting your printer and opening its settings.
Read Also: Rainbow 6 Siege Money Heist event - participate now!2. From the drop-down menu, select “Show Printers”. 3. In the “Printers and Scanners” window, locate your printer and select it. 4. Click the “Printer Portal” button to open its settings.
A window opens with your printer’s settings where you can make the necessary changes.
Next, we’ll move on to configuring print settings for duplex printing on your Mac. Continue reading in the next section.
Once you have selected your printer and opened the print panel, you need to enable the duplex printing option.
Your changes will be saved and printing will be done using duplex mode if your printer supports this feature.
To set up duplex printing on a Mac, you need to open your printer settings, select the duplex option, and save your changes.
Most modern printers support duplex printing on Mac. However, it is recommended that you check the specifications and compatibility with your computer before purchasing a printer.
To enable automatic two-sided printing on Mac, you need to open the printer settings, select the “automatic two-sided printing” option and save the changes. Now all documents will automatically print on both sides of the sheet.
To check if your printer supports duplex printing on a Mac, you can open the printer settings on your computer, find the duplex option, and see if it is available for selection. If the option isn’t available, your printer probably doesn’t support duplex printing.
To change the duplex settings on your Mac, you need to open the printer settings, find the duplex option, select the desired mode (automatic or manual), and save your changes.
Steps to schedule emails for gmail in android and iphone. One of the most popular email services is Gmail, which offers a wide range of …
Read Article
Pes 2021: will konami use the new engine in the next generation? Konami, the company known for its Pro Evolution Soccer (PES) soccer game series, is …
Read Article
How To Fix Video Call Not Working On Samsung Galaxy If you are experiencing issues with video calls on your Samsung Galaxy smartphone, this …
Read Article
13 Best Modem for Gaming in 2023 If you are an avid gamer, you know how important a fast and reliable internet connection is for a seamless gaming …
Read Article
Cybersecurity characteristics for your online business website Online businesses are becoming more and more popular these days, and with that, the …
Read Article
How To Fix LG TV Screen Is Flickering If you own an LG TV and notice that the screen is flickering, it can be an annoying and distracting issue. …
Read Article


