This shows how to take full-page screenshots on ios 13.
With the release of the new iOS 13 operating system, many useful features and improvements have been added for Apple device users. One such new feature was the ability to take full-page screenshots. Now you don’t have to take several separate screenshots and combine them into one file, just a few simple steps are enough.
Table Of Contents
Setting up and using this feature on iOS 13 devices is quite simple. First, open the page you want to screenshot. Then, press the lock button on your device (usually located on the right side) while simultaneously pressing the volume button (usually on the left side).
After pressing both buttons, your device will take a screenshot and you’ll be presented with a small image on the bottom right of the screen. Click on this thumbnail screenshot to open its full screen view. Device users on very long pages can now swipe through them and take full screenshots, not just the visible area.
How to take full-page screenshots on iPhone with the new iOS 13
With iOS 13, a new feature has been added to the iPhone that allows you to take full-page screenshots. You can now capture the entire page and save it as a single image. In this tutorial, we will tell you how to use this feature.
Step 1: Open the desired page
Go to the web page or app where you want to take a full-page screenshot.
Step 2: Press and hold the power button
Press and hold the power button on your iPhone. Along with the power button, press the volume down button (on the left side of the device) at the same time.
Step 3: Select “Devices” or “Save to Files”
A small screenshot image will appear on the screen on the bottom left. Click on it to open more options. “Devices” or “Save to Files” will appear in the top corner.
Step 4: Select “Save PDF to iBooks”
From the pop-up menu, select the “Save PDF to iBooks” option. The screenshot will be saved as a PDF file.
Go to the home page screen of your iPhone and open the iBooks app. Find your last saved screenshot under the “PDF” or “Books” section. Here you can view, edit or send the file.
Now you know how to take full-page screenshots on iPhone with the new iOS 13. This feature is especially useful when you need to capture the entire page of a website or a long document.
How to set up your device to take full-page screenshots in iOS 13
With iOS 13, iPhone and iPad users have the ability to take full-page screenshots that capture the content of an entire web page or document. This is a very useful feature that allows you to save long pages with full content, without having to take multiple screenshots and glue them together manually.
To use this feature, you will first need to set up your device. Here are step-by-step instructions on how to do that:
Open Settings on your device and go to Universal Access.
Next, select My Screen and click on Full Page Screenshots.
Turn on the switch next to Full-page screenshots.
Your device is now set up to take full-page screenshots. To take such a screenshot, simply open the web page or document you want to capture and follow the steps below:
Press and hold the Side button (on newer devices) or the Home button (on older devices).
A screenshot thumbnail will appear on the screen below. Tap it to create a full-page screenshot.
Your device will automatically scroll to the end of the page or document and capture all the content.
The screenshot will open in edit mode where you can add text, pictures, or notes.
Click Done to save the screenshot or repeat the process if you need to create another full-page screenshot.
Now you know how to set up your device to create full-page screenshots in iOS 13. This feature can be very useful for saving long pages with full content, and it is easily available in your device settings.
The process of creating and saving full-page screenshots on iOS 13
With iOS 13, Apple provides the ability to create and save full-page screenshots on iPhone and iPad devices. This is a very useful feature, especially when working with long web pages, documents, or apps.
Open any app or web page that you want to capture as a full-page screenshot.
Take a normal screenshot by pressing the lock button and home button or volume down button at the same time (for devices without a home button).
Once you’ve taken the screenshot, tap the thumbnail of the image to open it in the screenshot editor.
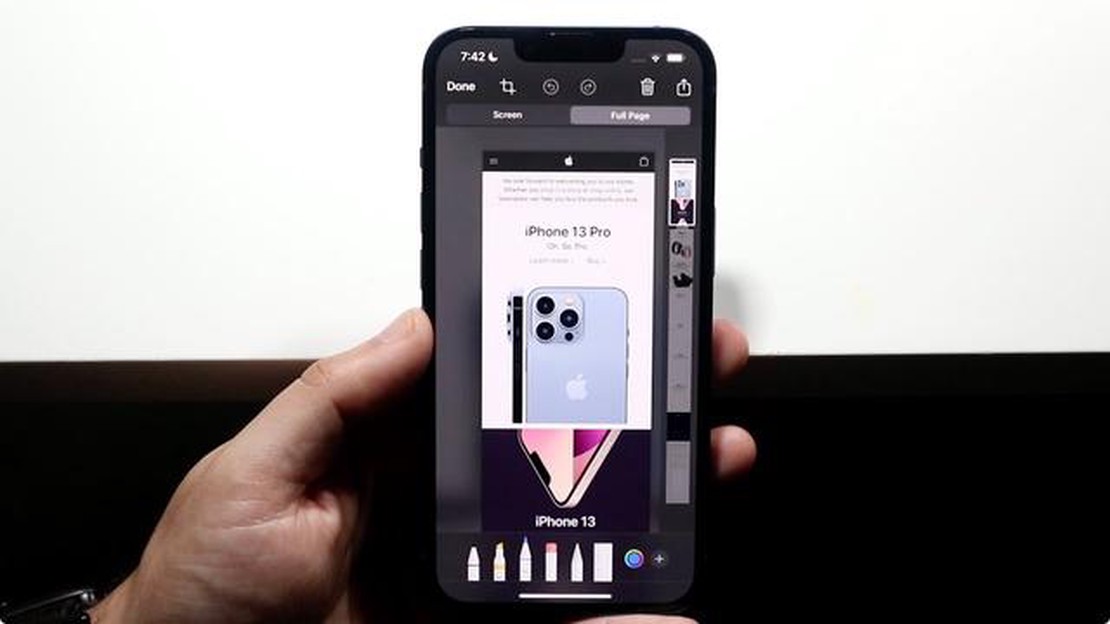
The screenshot editor toolbar will appear at the bottom of the screen. Click on the “Whole Page” button, which looks like four squares next to each other.
Wait a while for iOS to assemble the full-page screenshot. Then a preview of the full page will appear.
You can scroll up and down the page to make sure all the content has been captured. You can also edit or crop the screenshot if needed.
Once you have finished editing, click on the “Done” button in the upper right corner of the screen.
In the dialog box that appears, select “Save to Photo” or “Delete Screenshot”. If “Save to Photo” is selected, the screenshot will be saved to your photo library.
You now have a full-page screenshot that you can use as you see fit. This feature has made capturing long pages and other content on iOS devices much easier and more convenient.
FAQ:
How to take full-page screenshots on iOS 13?
To take a full-page screenshot on iOS 13, you need to take a regular screenshot, then tap on the screenshot thumbnail in the bottom right corner of the screen and select the “Full Screen” option.
What should I do if the Full Screen option does not appear after taking a screenshot?
If the “Full Screen” option doesn’t appear after taking a screenshot on iOS 13, you need to customize the option first. To do this, open the device settings, go to the “Screenshots and Camera” section and enable the “Full Screen” option. After that, the “Full Screen” option will be available when you take a screenshot.
Can I edit full-page screenshots on iOS 13?
Yes, you can edit full-page screenshots on iOS 13 just like regular screenshots. After taking a full-page screenshot, tap on the screenshot thumbnail and select the “Edit” option. In edit mode, you will be able to crop, caption, and make other changes to the screenshot.
How do I save a full-page screenshot on iOS 13?
To save a full-page screenshot on iOS 13, after creating it, tap on the screenshot thumbnail and select the “Save Image” option. The screenshot will be saved in the photo gallery on your device.
Can I take full-page screenshots only on certain iPhone models?
Yes, the ability to take full-page screenshots is only available on certain iPhone models, starting with iPhone X and newer models. On older devices, this feature may not be available.
How to fix Slow Internet Connection on Huawei P30 | troubleshoot network issue on Huawei P30 If you are experiencing slow internet connection on your …
10 Best Email App For Android Email is an essential tool for communication, and having a reliable email app on your Android device is crucial. With so …
How to prepare for microsoft 70-767 exam? Microsoft 70-767 certification is one of the most sought after certifications in the field of data analysis …