


The supabets mobile app in South Africa: how to download and use it
Supabets mobile app in south africa. Supabets is one of the most popular bookmakers in South Africa, offering players a wide range of betting …
Read Article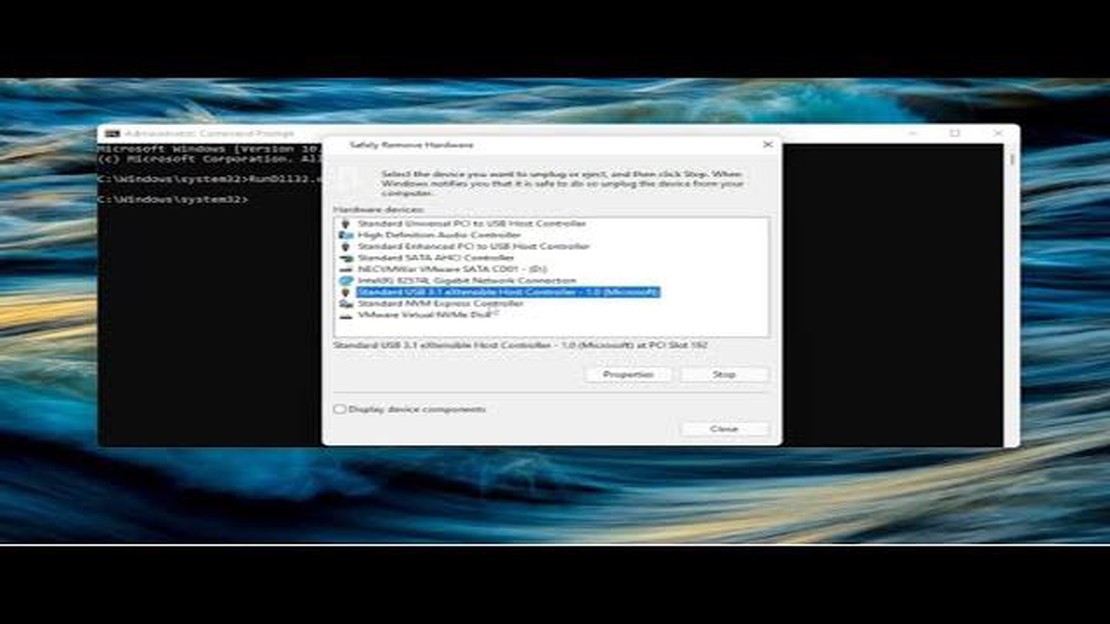
If you are experiencing difficulties ejecting your external hard drive on Windows 10, you are not alone. Many users encounter this issue, where the “Safely Remove Hardware” icon is grayed out and they are unable to safely disconnect their external storage device. This can be frustrating and potentially damaging to your data, as removing the drive without properly ejecting it can cause data corruption and other problems. Fortunately, there are several troubleshooting steps you can take to resolve this issue.
Step 1: Close all applications and processes
The first step is to ensure that all applications and processes that may be using your external hard drive are closed. This includes files that are currently open, as well as any background processes or applications that may be accessing the drive. You can check for open files using the Task Manager, and close any applications that are still accessing the drive.
Step 2: Use the “Eject” feature in File Explorer
Next, try using the built-in “Eject” feature in File Explorer. Simply right-click on your external hard drive in the navigation pane of File Explorer, and select “Eject” from the context menu. This should properly close any open files or processes and allow you to safely remove the drive. If this option is grayed out or does not work, proceed to the next step.
Step 3: Use the “Disk Management” tool
If the previous steps did not resolve the issue, you can try using the “Disk Management” tool in Windows 10. To access this tool, right-click on the Start button and select “Disk Management” from the context menu. In the Disk Management window, locate your external hard drive, right-click on it, and select “Eject” or “Offline” from the context menu. This should force the drive to disconnect and allow you to safely remove it.
Step 4: Restart your computer
If none of the previous steps work, restarting your computer may resolve the issue. Sometimes, certain processes or services can prevent the proper ejection of external storage devices. Restarting your computer can refresh these processes and allow you to safely eject your external hard drive. After restarting, try the previous steps again to see if the issue has been resolved.
In conclusion, the inability to eject an external hard drive on Windows 10 can be a frustrating problem. However, by following the steps outlined in this guide, you should be able to resolve the issue and safely remove your external storage device. Remember to always properly eject your external hard drive to prevent data corruption and other problems.
When using an external hard drive on Windows 10, you may encounter the issue of not being able to safely eject the drive. This can be frustrating and may result in data loss or damage to the drive. Fortunately, there are several steps you can take to fix this problem and safely eject your external hard drive.
Read Also: Mobile evolution: is a replacement for computer games possible?
Before ejecting your external hard drive, make sure that all files and programs stored on the drive are closed. Open files or running programs can prevent Windows from being able to safely eject the drive. Go through your open windows and applications and close any that are accessing the external hard drive.
In some cases, there may be background processes running on your computer that are accessing the external hard drive. These processes can also prevent you from safely ejecting the drive. Open the Task Manager by pressing Ctrl + Shift + Esc and go to the “Processes” tab. Look for any processes that are associated with your external hard drive and end them.
Windows 10 includes a built-in feature called “Safely Remove Hardware” that allows you to safely eject external devices. To use this feature, right-click on the “Safely Remove Hardware” icon in the system tray (located in the bottom-right corner of the screen) and select your external hard drive from the list of devices. Follow the prompts to safely eject the drive.
Outdated or incompatible device drivers can sometimes cause issues with ejecting external hard drives. To update your device drivers, go to the Device Manager by pressing Windows Key + X and selecting “Device Manager” from the menu. Locate your external hard drive under the “Disk drives” or “Portable devices” section, right-click on it, and select “Update driver.” Follow the prompts to update the driver.
Windows 10 uses write caching to optimize the performance of external storage devices. However, write caching can sometimes interfere with the safe ejection of the drive. To disable write caching for your external hard drive, go to the Device Manager, locate your drive, right-click on it, and select “Properties.” In the Properties window, go to the “Policies” tab and uncheck the box next to “Enable write caching on the device.” Click “OK” to save the changes.
If the above steps do not resolve the issue, you can try using a third-party tool to safely eject your external hard drive. There are several free and paid options available online that provide additional features and customization options for ejecting external devices.
Read Also: Multiverse does not start on Xbox: possible causes and solutions to the problem
By following these steps, you should be able to fix the issue of not being able to safely eject your external hard drive on Windows 10. Remember to always safely remove your external devices to prevent data loss or drive damage.
If you are encountering issues with ejecting an external hard drive on Windows 10, follow these steps to resolve the problem:
By following these steps, you should be able to resolve the “Cannot Eject External Hard Drive” issue on Windows 10. If the problem persists, it is recommended to seek further assistance from a professional or contact the support team of the external hard drive manufacturer.
There are several reasons why you may not be able to eject your external hard drive on Windows 10. One common reason is that a file or program on the drive is still in use by your computer or another application. Another reason could be that the drive is experiencing a hardware issue or there is a problem with the driver software.
To fix the issue of not being able to eject your external hard drive on Windows 10, you can try several solutions. First, make sure that all files and programs on the drive are closed or not in use. You can use the Task Manager to check for any running processes. If that doesn’t work, you can try restarting your computer and then attempting to eject the drive again. If the issue persists, you can try updating the driver software for the external hard drive or using the “Safely Remove Hardware” option in the system tray.
If you still can’t eject your external hard drive after trying the solutions mentioned above, you may need to use a tool like the “Disk Management” utility in Windows 10 to force the eject. To do this, open the utility, right-click on the external hard drive, and select the “Eject” or “Offline” option. Be cautious when using this method, as it can potentially result in data loss or damage to the drive. If all else fails, you may need to consult with a professional or contact the manufacturer for further assistance.
Forcefully ejecting your external hard drive can potentially cause data loss or damage to the drive. It is always recommended to properly eject removable devices to ensure that all data is saved and the device is safely disconnected from the computer. However, if you have tried all other methods and are unable to safely eject the drive, using a tool like the “Disk Management” utility to force the eject may be your last resort. Just be aware of the potential risks involved.
There are a few ways to prevent the issue of not being able to eject your external hard drive in the future on Windows 10. Firstly, make sure to close all files and programs on the drive before attempting to eject it. This will help ensure that no processes are still accessing the drive. Additionally, you can try disabling any applications or services that may be accessing the drive in the background. Finally, regularly update your driver software and keep your Windows 10 system up to date to minimize any potential conflicts or issues.
There could be several reasons why your external hard drive is not ejecting on Windows 10. It could be due to a running application or process that is accessing the drive, a problem with the USB connection, or a malfunctioning driver. It is important to ensure that all applications and processes are closed and that the drive is properly connected before attempting to eject it.
If you cannot eject your external hard drive on Windows 10, there are several steps you can try to resolve the issue. First, make sure that all applications and processes accessing the drive are closed. Then, try unplugging the USB connection and plugging it back in. If that doesn’t work, you can try restarting your computer and then attempting to eject the drive again. If the problem still persists, you may need to check for any driver updates or use the “Safely Remove Hardware” feature in Windows to safely eject the drive.
Supabets mobile app in south africa. Supabets is one of the most popular bookmakers in South Africa, offering players a wide range of betting …
Read Article
How To Activate Power Saving Mode on Samsung Galaxy A51 Are you tired of your Samsung Galaxy A51’s battery draining too fast? Well, activating the …
Read Article
Solutions for Android Javascript Problems Welcome to SiteName Mailbag, where we answer your burning questions about Android Javascript problems! In …
Read Article
Galaxy S20 no sound. Here’s how to fix it! If you are experiencing sound issues with your Samsung Galaxy S20, you’re not alone. Many users have …
Read Article
How To Fix High CPU Usage By TiWorker.exe On Windows 10 If you are experiencing high CPU usage on your Windows 10 device and you have noticed that the …
Read Article
5 Ways to Cancel Samsung Care Without Calling Customer Support Samsung Care is a service offered by Samsung that provides extended warranty and …
Read Article


