
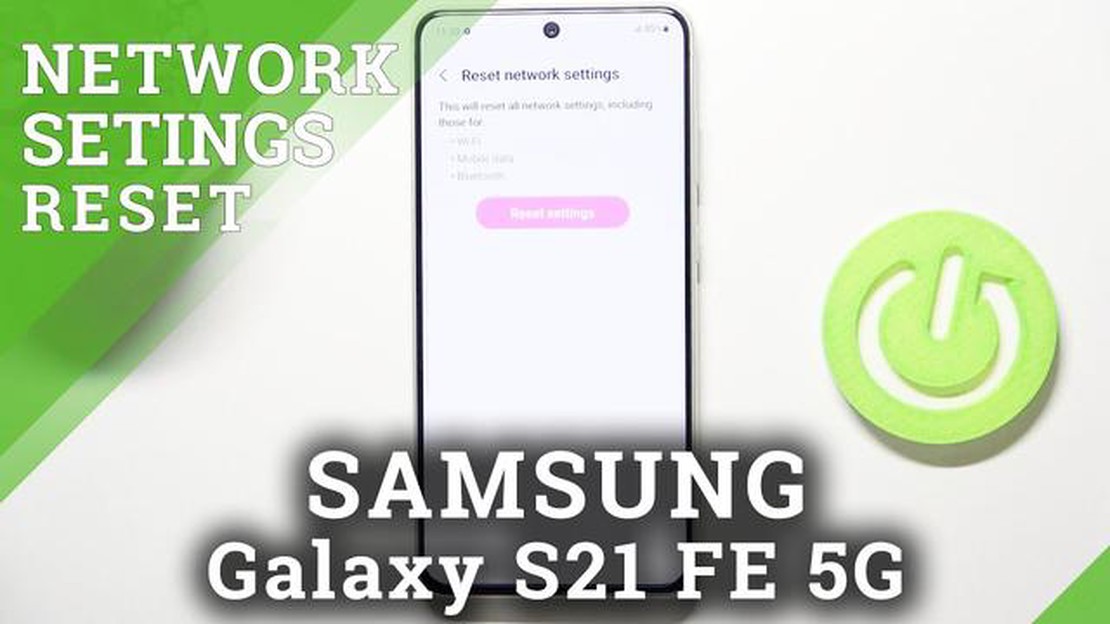

Reset Network Settings on Samsung Galaxy S21 - Restore Network Defaults
How to Reset Network Settings on Samsung Galaxy S21 | Restore Network Defaults If you’re experiencing network-related issues on your Samsung Galaxy …
Read Article
If you own a Fitbit Sense smartwatch, you might be interested in customizing its appearance by changing the clock face. The Fitbit Sense offers a wide range of clock faces to choose from, allowing you to personalize your device and display the information that matters to you most. In this step-by-step guide, we will walk you through the process of changing the clock face on your Fitbit Sense.
To begin, make sure your Fitbit Sense is paired with the Fitbit app on your smartphone. Open the Fitbit app and tap on your profile icon at the top-left corner of the screen. From the menu that appears, select “Clock Faces.” You will be taken to the gallery of available clock faces.
Next, browse through the collection of clock faces and find one that catches your eye. You can swipe left or right to see different options, and you can tap on a clock face to see a preview of how it would look on your Fitbit Sense. Once you have found a clock face you like, tap on it to select it.
After selecting a clock face, you will see a screen with additional customization options. Here, you can choose which stats you want to track and display on your clock face. You can also adjust the color scheme or choose between a 12-hour or 24-hour clock format. Once you have made your desired changes, tap on “Set as Clock Face” to apply the new clock face to your Fitbit Sense. Within a few moments, your device will update and display the new clock face.
That’s it! You have successfully changed the clock face on your Fitbit Sense. Feel free to experiment with different clock faces and customize your device to match your style and preferences. Enjoy your new Fitbit Sense clock face!
If you own a Fitbit Sense smartwatch and want to give it a fresh look, changing the clock face is a great way to customize your device. Fitbit Sense offers a wide range of clock face options to suit your style and preferences. In this step-by-step guide, we will walk you through the process of changing the clock face on your Fitbit Sense.
Read Also: Red dead redemption 2: launch problems on PC? We are with you!
Changing the clock face on your Fitbit Sense is a simple and quick process that allows you to personalize your device. Whether you prefer a minimalist design or a more detailed display, Fitbit Sense offers a variety of clock face options to suit your style and preferences. Have fun experimenting with different clock faces and give your Fitbit Sense a fresh new look.
To change the clock face on your Fitbit Sense, you will first need to access the clock face settings. Follow the steps below:
By following these steps, you will be able to access the clock face settings on your Fitbit Sense.
Once you have accessed the clock face settings on your Fitbit Sense, you can now choose a new clock face to use. Fitbit offers a wide variety of clock faces to suit your style and preferences. Follow the steps below to choose a new clock face:
Once you have selected a new clock face, it will be applied to your Fitbit Sense. You can customize the clock face further by accessing the clock face settings again. Simply follow the steps outlined in previous sections to make any necessary changes.
If you want to give your Fitbit Sense a personal touch, you can customize the clock face. Here’s how you can do it:
Read Also: Top 11 Offline Action RPG Games for Android in 2023
That’s it! Your clock face will change on your Fitbit Sense according to your selection. Remember, customizing the clock face is optional, so if you’re happy with the default clock face, you can skip this step.
To change the clock face on your Fitbit Sense, you need to open the Fitbit app on your smartphone and tap on the “Today” tab. Then, tap on your profile picture and select your Fitbit Sense. Scroll down until you find the “Clock Faces” option and tap on it. From there, you can browse through the available clock faces and choose the one you like. Once selected, the clock face will sync to your Fitbit Sense.
Yes, you can customize the clock face on your Fitbit Sense. After selecting a clock face from the “Clock Faces” option in the Fitbit app, you can often customize it further. Some clock faces allow you to change the color, layout, and even display additional information such as heart rate or steps taken. The customization options may vary depending on the specific clock face you choose, but there are many options available to personalize your Fitbit Sense.
Yes, there are many free clock faces available for Fitbit Sense. When you browse through the clock faces in the Fitbit app, you will see a mix of both free and paid options. The free clock faces are marked with a label indicating that they are free to download. These clock faces offer a variety of styles and features, allowing you to find one that suits your preferences without having to spend any additional money.
No, Fitbit Sense does not currently support using your own photos as a clock face. However, there are many different clock faces available in the Fitbit app that might suit your style or preferences. You can choose from various designs, colors, and layouts to find a clock face that you like. While you cannot use your own photos, there are plenty of options to personalize your Fitbit Sense and find a clock face that matches your taste.
How to Reset Network Settings on Samsung Galaxy S21 | Restore Network Defaults If you’re experiencing network-related issues on your Samsung Galaxy …
Read Article
How to Enable Music Sharing Feature on Samsung Galaxy Tab S6: Step-by-Step Guide The Samsung Galaxy Tab S6 is a powerful tablet that offers a range of …
Read Article
How to Block A Number on Redmi Note 8 If you own a Redmi Note 8 smartphone and want to block a specific number from calling or texting you, you’re in …
Read Article
How to fix lag and slow performance issues on a Galaxy S5, other unrelated problems The Galaxy S5, released in 2014, was a flagship device from …
Read Article
How To Fix Xbox Series X Wi-Fi Lag Problem If you are experiencing Wi-Fi lag issues with your Xbox Series X, you’re not alone. Many users have …
Read Article
10 coolest professions in india that you should definitely check out India is a country with a rich culture and lots of career opportunities. The …
Read Article


