How to wipe cache partition on Samsung Galaxy S9 and what are its benefits?
Is your Samsung Galaxy S9 starting to feel sluggish? Are you experiencing app crashes or other performance issues? Clearing the cache partition on your device can help resolve these problems and improve overall performance. In this step-by-step guide, we will show you how to clear the cache partition on your Samsung Galaxy S9.
Table Of Contents
Before we dive into the steps, let’s talk about what exactly the cache partition is and why clearing it can be beneficial. The cache partition is a reserved space on your device’s storage that stores temporary files and data from various apps and processes. Over time, these files can accumulate and become corrupted, leading to performance issues. Clearing the cache partition not only frees up valuable storage space but also helps ensure that your device is running smoothly.
It is important to note that clearing the cache partition on your Samsung Galaxy S9 will not delete any personal data or settings. However, it will remove temporary files and data from apps and processes, so you may need to sign in again to some apps. Now, let’s get started with the step-by-step guide on how to clear the cache partition on your Samsung Galaxy S9.
Step-by-Step Guide: Clear Cache Partition
If you are experiencing issues with your Samsung Galaxy S9, such as lag or performance problems, clearing the cache partition can help improve the device’s overall performance. The cache partition contains temporary files and data that can accumulate over time and may cause issues with the device’s operation. Here’s a step-by-step guide on how to clear the cache partition on your Samsung Galaxy S9.
Turn off your Samsung Galaxy S9.
Press and hold the Volume Up button, Bixby button, and Power button simultaneously.
Release all buttons when the Android logo appears on the screen.
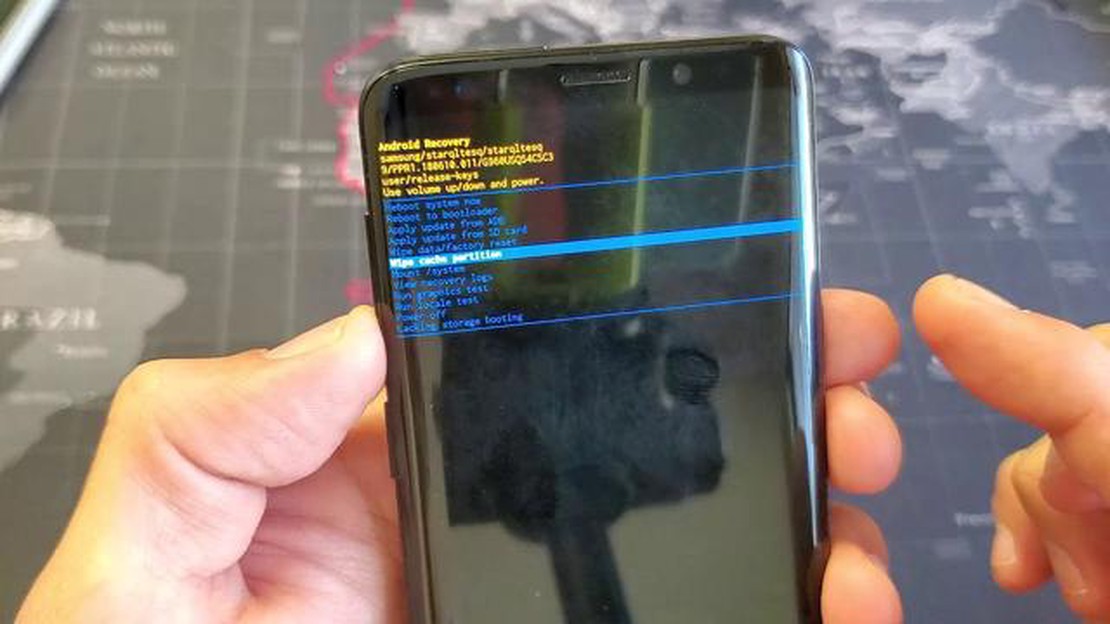
Use the Volume Down button to navigate to the “Wipe cache partition” option.
Press the Power button to select the option.
Use the Volume Down button to highlight “Yes” and press the Power button to confirm.
Wait for the cache partition to be cleared.
Once the process is complete, “Reboot system now” will be highlighted.
Press the Power button to restart your Samsung Galaxy S9.
After clearing the cache partition, your device will reboot and you should notice an improvement in its performance. This process does not delete any personal data or settings, so you don’t have to worry about losing any important information.
If you are still experiencing issues with your Samsung Galaxy S9 after clearing the cache partition, you may consider performing a factory reset or contacting Samsung support for further assistance.
Why should you clear cache partition on Samsung Galaxy S9?
Clearing the cache partition on your Samsung Galaxy S9 can provide several benefits for your device. Here are some reasons why you should consider clearing the cache partition:
Improved performance: Over time, the cache partition accumulates temporary files and data from various apps and processes. These files can take up unnecessary space and cause your device to slow down. By clearing the cache partition, you can free up storage space and improve the overall performance of your Galaxy S9.
Resolve app issues: Clearing the cache partition can help resolve issues with specific apps. Sometimes, app data stored in the cache partition can become corrupted or outdated, causing the app to malfunction. By clearing the cache partition, you can remove this data and start fresh, potentially resolving any issues you may be experiencing.
Fix software glitches: If you are encountering random software glitches or crashes on your Galaxy S9, clearing the cache partition can help. By removing temporary system files and data, you can eliminate any potential conflicts or errors that may be causing the glitches.
Optimize storage: Clearing the cache partition can help optimize your device’s storage space. Temporary files and data stored in the cache partition can take up a significant amount of storage, especially if you have many apps installed. By clearing the cache partition, you can free up valuable storage space for other files and apps.
Overall, clearing the cache partition on your Samsung Galaxy S9 is a simple yet effective way to improve performance, resolve app issues, fix software glitches, and optimize storage. It is recommended to clear the cache partition periodically to ensure your device runs smoothly.
How to clear cache partition on Samsung Galaxy S9?
Clearing the cache partition on your Samsung Galaxy S9 can help optimize the performance of your device and resolve various issues. Here’s a step-by-step guide on how to clear the cache partition:
Power off your Samsung Galaxy S9.
Press and hold the Volume Up button and the Bixby button simultaneously, then press and hold the Power button.
Continue holding all three buttons until the Samsung logo appears on the screen, then release the buttons.
Wait for the Android recovery menu to appear on the screen.
Use the Volume Down button to navigate to the “Wipe cache partition” option.
Press the Power button to select the option.
Use the Volume Down button to highlight “Yes” and press the Power button to confirm.
Wait for the cache partition to be cleared.
Once the process is complete, the “Reboot system now” option will be highlighted.
Press the Power button to restart your Samsung Galaxy S9.
After clearing the cache partition, your Samsung Galaxy S9 will reboot and the cache will be cleared. This process does not delete any personal data from your device. It only clears temporary files and can help improve the performance of your device.
FAQ:
Why should I clear the cache partition on my Samsung Galaxy S9?
Clearing the cache partition can help improve the performance of your Samsung Galaxy S9. It can free up storage space, fix app crashes and freezes, and resolve various software issues.
Will clearing the cache partition delete any data on my Samsung Galaxy S9?
No, clearing the cache partition will not delete any data on your Samsung Galaxy S9. It only clears temporary files and data that are stored in the cache partition.
Can clearing the cache partition solve software issues on my Samsung Galaxy S9?
Yes, clearing the cache partition can help resolve software issues on your Samsung Galaxy S9. It clears temporary files and data that may be causing conflicts or errors in the software. It can fix app crashes and freezes, improve performance, and resolve various software-related issues.
How often should I clear the cache partition on my Samsung Galaxy S9?
There is no specific timeframe for clearing the cache partition on your Samsung Galaxy S9. It is recommended to do it whenever you notice performance issues, app crashes, freezes, or other software-related problems. You can also clear the cache partition as a regular maintenance routine to keep your device running smoothly.
9 Best Android Lock Screen Apps in 2023 In the fast-paced world of smartphones, keeping your device secure and protected is more important than ever. …
How To Fix Samsung Galaxy J7 Wont Charge, Other Charging Issues (Step-by-step Troubleshooting Guide) If you’re a Samsung Galaxy J7 owner and have been …
Fixing The Samsung Galaxy Note 4 Randomly Shutting Off Issue & Other Power Related Problems The Samsung Galaxy Note 4 is a popular smartphone that is …
How to disable Galaxy Note10+ background data usage One of the most common worries for smartphone users is excessive background data usage, as it can …