


Top 5 MicroSD Memory Cards for LG X Charge
5 Best MicroSD Memory Card For LG X Charge The LG X Charge is a popular smartphone known for its long-lasting battery life and powerful performance. …
Read Article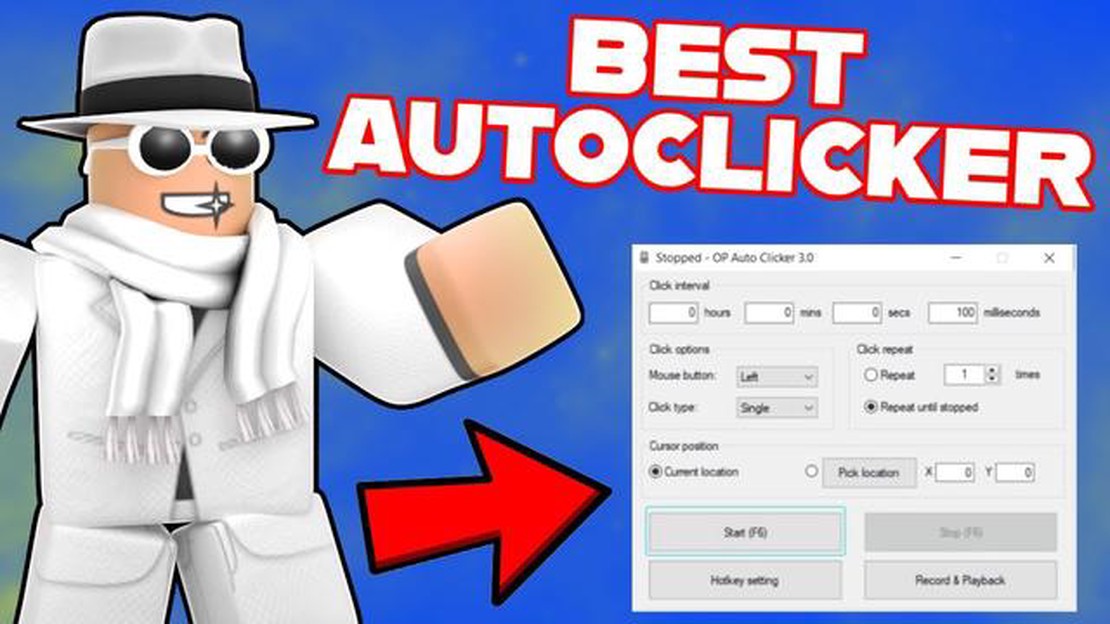
An autoclicker is software that automatically executes mouse clicks on your computer. It can be useful in a multitude of scenarios, such as games that require repetitive execution of similar actions, web development for user interface testing, and other situations where multiple clicks are required.
Setting up an autoclicker may seem like a daunting task for beginners, but with the help of this detailed guide, you’ll quickly get the hang of it. You will need some basic computer knowledge and mouse skills.
**Step 1: Download and install the autoclicker program.
The first step is to download and install an autoclicker program on your computer. There are many free and paid autoclickers available online. Choose the one that best suits your needs and follow the installation instructions on your operating system.
Step 2: Run the program and configure the settings.
After installing the program, run it on your computer. In most cases, you will see a window with options for customizing the auto-clicker. Specify the parameters you want, such as the interval between clicks, the selection of the mouse button to click, and the screen coordinates to click.
Note: Be careful when setting up an autoclicker for use in online games. Some games prohibit the use of such programs and may lock your account.*.
Step 3: Run the autoclicker and test its operation.
After completing the setup, run the autoclicker. It should start automatically performing clicks according to the settings you have made. Verify that the autoclicker works correctly by performing a few clicks on an empty area of the screen or in the program in which you want to use the autoclicker.
Now you know how to set up the autoclicker for your computer. Remember that the use of autoclicker must be legal and ethical. It is important to use this software only in accordance with the rules and recommendations of the program developer or the owner of the service where you are using it..
Auto Clicker is a handy tool that allows you to automate the process of mouse clicking. It can be useful for monotonous tasks, such as farming resources in a game or automatically performing repetitive actions on a web page.
In this guide, we’ll show you how to properly configure the autoclicker to make the most of its capabilities.
The first step in setting up an autoclicker is to download and install the appropriate software. There are many autoclickers available online, but note that some of them may be malicious. It is recommended to download programs from verified sources.
We recommend choosing a popular auto clicker such as “Auto Clicker” or “OP Auto Clicker”. They have a simple interface and are reliable to use.
After installing Auto Clicker, open the program and define the point where you want to make the click. Usually this will be a coordinate on the screen or a specific element (button, input field, etc.).
In most autoclickers, you can use the “Capture Point” feature or specify the coordinates manually.
Now customize the frequency and number of clicks that the autoclicker will perform. In most programs, you can set the delay (the time between clicks) and the number of clicks that will be performed.
Think about what exactly you need: if you need to farm resources in the game, you will probably need a high click rate. If you are using an autoclicker on a web page, you may need a lower speed.
Before you run the autoclicker, carefully review all of your settings to make sure they meet your requirements. If everything looks correct, then you are ready to run the autoclicker.
Many programs have a “Start” button or corresponding function that starts the clicker process. This often provides the option to select the “Infinite” option if you want the autoclicker to run indefinitely until you stop it.
Once the autoclicker is running, you can see how it performs the clicks to the location you specified. If something goes wrong, you can stop the autoclicker by clicking the stop button or closing the program.
It is important to keep an eye on the autoclicker, especially if you are using it in a game or on a web page. Make sure it works as you intended and doesn’t navigate to unexpected objects or cause errors.
Read Also: Simple Solutions to Fix the Huawei P20 Mobile Network Not Available Issue
If you want to change your autoclicker settings, you can stop it, make changes and then start it again.
That’s it! Now you know how to properly set up autoclicker and use it to automate clicks. Remember that using autoclicker may not be allowed in some games or web pages, so be careful not to violate the usage rules.
Before you start using autoclicker, you need to download and install the special software. There are many free and paid autoclickers that can be found online. In this guide, we will go through the process of installing the free AutoClicker autoclicker.
Now that you have successfully installed the autoclicker, you can move on to customizing and using its features. In the next section of the guide, we will cover the steps to customize the autoclicker.
Read Also: How to maximize earnings on sponsored posts: secrets of successful brand partnerships
After installing autoclicker on your computer, the first thing you need to do is to configure the program settings for the game you want to play. In this section we will look at the main parameters that need to be configured.
Before you start using the auto-clicker, you must specify which buttons or keys you want the clicker to press. Depending on the game, you may need to press certain buttons to perform the desired actions. For example, in one game it might be the “left mouse click” button, and in another game it might be the “Space” key. Make sure that the selected button does not conflict with other actions in the game.
The second important parameter is the interval between clicks. This is the time that will pass between pressing and releasing the selected button. You need to set this interval so that the clicker works efficiently and does not cause suspicion. You will have to experiment a bit to determine the optimal time between clicks in your game.
For example, if you need to click on objects on the screen as quickly as possible, you can set the interval to 0 or close to it. However, if your game has an automation protection mechanism, clicking too quickly may cause your account to be locked. In such cases, it is recommended to set a small interval, for example, 100-200 milliseconds.
Some game tasks may require you to click on a certain place on the screen. Configure the autoclicker to specify the coordinates of the click point. The setting may be different depending on the program you use for autoclicker.
If your autoclicker supports “record” mode, you can do this: open the desired game and start recording mouse movements and clicks. If your autoclicker does not support recording mode, you will have to manually specify the coordinates of the click point.
In some cases, you may need to configure additional parameters, such as the delay before the clicker starts or the number of repetitions. Each program may have different settings, so it is recommended that you consult your documentation or user manual for more information.
Autoclicker settings for each game may be different, so it is recommended to perform thorough testing and customize the clicker according to the requirements of your game.
Once all settings have been configured, you can move on to the next step - run the autoclicker and test its performance in the selected game.
Once you have configured your autoclicker with the correct coordinates and intervals, you can start testing and optimizing the settings. In this step, you will test how effective your setup is and make the necessary changes to achieve better results.
1. Testing the autoclicker
The first thing you should do is run your autoclicker and test it on a specially selected area of the screen or in a game window. Pay attention to the following points:
2. Optimize settings
If you find problems or unsatisfactory results during testing, you should make changes to your autoclicker settings. Below are the main settings that you can adjust to optimize:
Use these options to customize the autoclicker to your liking. It may take some time to find the optimal settings for your task, so be prepared to do some experimentation and testing.
After optimizing your autoclicker, it is recommended that you retest its performance to make sure that the changes are producing the desired results. If necessary, you can repeat the optimization process to achieve the best results.
An autoclicker is a program that automatically clicks on a specified location on your computer screen. It can be useful in many situations, such as playing online games, performing monotonous tasks, or testing websites. Autoclickers usually have different settings that can be customized according to your needs.
There are many autoclicker programs available in the market. The program you choose depends on your needs and preferences. One of the most popular autoclickers is AutoClicker. This program has a simple interface and many useful features. However, you can do your own research and choose the program that best suits your needs.
Setting up Autoclicker involves several steps. First, you need to install the program on your computer. Next, open the program and select the section of the screen you want to click on. Then, customize the interval between clicks and the number of clicks. Some autoclickers also offer additional features such as color detection to only click on a certain color on the screen. Once you have configured all the settings, save and run the autoclicker.
Yes, many autoclickers allow you to run in the background. This means that you can perform other tasks on your computer while the autoclicker is still running. You just need to set the appropriate option in the autoclicker program. This way, you can use your computer for other purposes without interrupting the autoclicker.
Using autoclicker in online games is not recommended and may result in your account being banned. Many online games have rules that prohibit the use of third-party programs to automatically click on the screen. If you are detected using an auto-clicker in a game, your account may be blocked or suspended. Therefore, it is better to avoid using autoclicker in online games and follow the rules of the game.
5 Best MicroSD Memory Card For LG X Charge The LG X Charge is a popular smartphone known for its long-lasting battery life and powerful performance. …
Read Article
How to fix a Sony Xperia XZ Premium smartphone that cannot make or receive phone calls (easy steps) If you own a Sony Xperia XZ Premium smartphone and …
Read Article
Why learn python? 7 reasons to learn python in 2023 Python is one of the most popular programming languages in our era. It is widely used in fields …
Read Article
How To Set Disappearing Messages In Signal Sending messages that automatically disappear after a certain period of time has become a popular feature …
Read Article
How To Fix High CPU Usage By TiWorker.exe On Windows 10 If you are experiencing high CPU usage on your Windows 10 device and you have noticed that the …
Read Article
How To Change Your Display Name In COD Vanguard | Easy Steps (Updated 2023) Are you tired of your old display name in Call of Duty: Vanguard and want …
Read Article


