How to run Windows 10 on Mac with VirtualBox: step-by-step instructions

post-thumb

How to run windows 10 on mac using virtualbox.

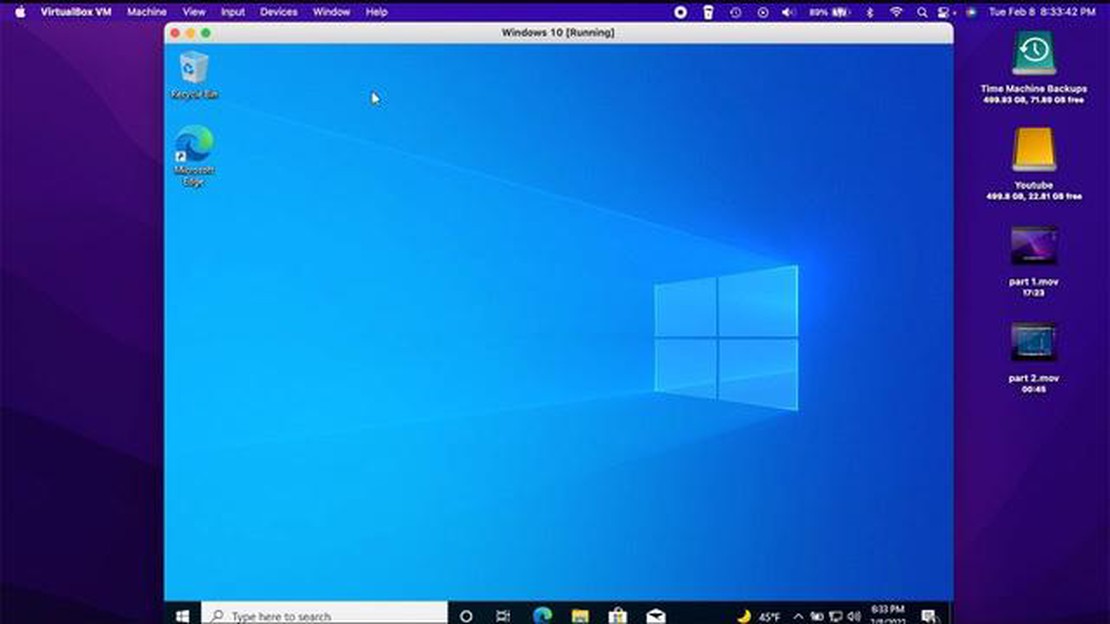
Many Mac owners often find themselves using the Windows operating system. Whether it’s to work with programs that are only available for Windows, or to test websites in different browsers. VirtualBox is free software that allows you to run virtual machines with a variety of operating systems, including Windows 10. In this step-by-step instruction, we will show you how to run Windows 10 on Mac using VirtualBox.

Table Of Contents

Step 1: Download VirtualBox and Windows 10

The first step is to download and install VirtualBox on your Mac. You can download it from the official VirtualBox website. After installing VirtualBox, you will also need a Windows 10 installation image. You can download it from Microsoft’s official website. Make sure you choose the right version of Windows 10 for your Mac.

Step 2: Create a new virtual machine

After installing VirtualBox, open it and click on the “New” button to create a new virtual machine. Set the name and type of operating system (Windows 10) for your virtual machine. Make sure you choose the 64-bit Windows 10 version if your Mac supports it.

Step 3: Configure the virtual machine

While configuring the virtual machine, you have to specify several parameters such as the amount of RAM, number of processors, and the size of the virtual hard disk. You can customize these settings according to your needs, but make sure you allocate enough resources to run Windows 10 smoothly on your Mac.

Step 4: Install Windows 10 in a virtual machine

After setting up the virtual machine, select the Windows 10 ISO image file you downloaded earlier as the boot option. Start the virtual machine and follow the instructions of the Windows 10 installer to install the operating system on the virtual hard disk. Once the Windows 10 installation is complete, enjoy running the operating system on your Mac using VirtualBox!

While running Windows 10 on your Mac using VirtualBox may take some time and require some of your computer’s resources, it’s a great way to utilize both operating systems on the same device. Virtual machines also allow you to experiment with different versions of Windows and other operating systems without having to create separate partitions on your hard drive. Use these step-by-step instructions and enjoy Windows 10 on your Mac!

Preparing to install Windows 10 on your Mac using VirtualBox

Before you can run Windows 10 on your Mac using VirtualBox, there are a few preparatory steps you need to take.

  1. Check your system requirements: Before installing Windows 10, make sure your Mac meets the minimum requirements. Make sure you have enough RAM and free hard disk space.
  2. **Download VirtualBox:**Go to the official VirtualBox website and download the latest version of the program for Mac.
  3. Download Windows 10 image: Go to the official Microsoft website and download the Windows 10 image. Make sure the version you want to install on your Mac is selected.
  4. Install VirtualBox: Run the downloaded VirtualBox installer and follow the installation instructions.

After completing these steps, you’ll be ready to install Windows 10 on your Mac using VirtualBox.

Downloading and installing VirtualBox on a Mac

To run Windows 10 on Mac using VirtualBox, you’ll need to first install the VirtualBox program itself on your computer. Here are step-by-step instructions for installing VirtualBox on your Mac:

Read Also: Easy Ways to Test Android Internet Speed - Step-by-Step Guide
  1. Go to the official VirtualBox website (https://www.virtualbox.org/ ) in a web browser on your Mac.
  2. On the home page of the site, find the “Downloads” section and click on “OS X Hosts” to download the installation file for your Mac.
  3. When the download completes, locate the VirtualBox installation file on your computer (usually a .dmg file) and open it.
  4. Double-click on the installation file to launch the VirtualBox installation program.
  5. Follow the on-screen instructions to install VirtualBox on your Mac. You may need to enter your administrator password.
  6. When the installation is complete, you will see a message that VirutalBox has been successfully installed. Click “Finish” to complete the installation.

Congratulations!!! You now have VirtualBox installed on your Mac, and you’re ready to start creating a virtual machine to run Windows 10.

Downloading a Windows 10 image for VirtualBox

To install Windows 10 on your Mac using VirtualBox, you need to download a Windows 10 operating system image. The instructions are as follows:

  1. Open a web browser and go to https://www.microsoft.com .
  2. On the home page of the site, hover over the Download Windows 10 section and select the Download Media Creation Tool option.
  3. After downloading the tool, install it on your Mac.
  4. Run the installed Windows 10 media creation tool.
  5. In the window that appears, select the Create installation media (USB flash drive, DVD, or ISO file) for another computer and click Next.
  6. Make sure you have enough free disk space to save the Windows 10 image and select the ISO file option. Click the Next button.
  7. Select the location to save the Windows 10 image and click the Save button.
  8. Wait for the Windows 10 image download to complete.

Congratulations! You now have a Windows 10 operating system image that you can use to install on your Mac using VirtualBox.

Creating a virtual machine in VirtualBox

To run Windows 10 on a Mac using VirtualBox, you need to create a new virtual machine. This section will describe how to perform this operation.

  1. Start VirtualBox. After installing the program, locate the VirtualBox shortcut in your Applications folder and launch it.
  2. Click the “New” button. In the top panel of VirtualBox, find the “New” button and click it.
  3. **Set the name and type of virtual machine.**In the window that appears, enter the name of the virtual machine, for example, “Windows 10”, and select the type of operating system you want to install on the virtual machine (for example, “Windows 10 (64-bit)”). Click the “Next” button.
  4. Select the amount of RAM. In the next window, select the amount of RAM you want to allocate to the virtual machine. It is recommended to use at least 2 GB of RAM for Windows 10. Click on the “Next” button.
  5. Create a virtual hard disk. You will be prompted to create a new virtual hard disk or use an existing one. Select the “Create a virtual hard disk” option and click on the “Create” button.
  6. Select hard disk type and size. In the next window, select the type of hard disk (it is recommended to select the “VDI” option) and set its size. It is recommended to allocate at least 20 GB for Windows 10 installation. Click on the “Create” button.
  7. Customize the virtual machine. Go back to the main VirtualBox window and select the virtual machine you created. Click on the “Customize” button. In the window that appears, you can configure various settings for the virtual machine, such as the number of processors, video card, network settings, and other settings.
  8. Install the operating system. After configuring the virtual machine, start it by clicking on the “Start” button. You will be prompted to install the operating system on the virtual machine. To do this, you will need a Windows 10 installation image. Follow the instructions to install the operating system.

Congratulations!!! You now have a Windows 10 virtual machine on your Mac using VirtualBox.

Creating a new virtual machine

Before you can run Windows 10 on your Mac using VirtualBox, you’ll need to create a new virtual machine. Follow these steps:

Read Also: Facebook Timeline Not Updating on Galaxy S22: Step-by-Step Guide | [Website]
  1. Start VirtualBox. If you don’t already have VirtualBox installed, you can download it from the official VirtualBox website and install it on your Mac.
  2. Click the “New” button. You will see the “New Virtual Machine Wizard” window.
  3. Designate a name and type of virtual machine. Enter a name for your virtual machine (e.g., “Windows 10”) and select the type of operating system you want to install (e.g., “Microsoft Windows”). Click “Next”.
  4. Select the amount of RAM. It is recommended that you select the amount of RAM sufficient to support your virtual machine and guest operating system (Windows 10 typically requires a minimum of 2GB of RAM). Click Next.
  5. Create a virtual hard disk. Select the “Create a virtual hard disk now” option and click “Create”.
  6. Select the type of virtual hard disk. It is recommended that you select the “VDI (VirtualBox Disk Image)” option. Click “Next”.
  7. Select the storage type. You can choose between “Dynamic” and “Fixed” storage type of the virtual hard disk. Dynamic type saves disk space while fixed type provides better performance. Select an option and click “Next”.
  8. Select the size of the virtual hard disk. It is recommended that you select a size large enough to install and run Windows 10 (usually around 40-50 GB). Click “Create.”

Congratulations! You’ve just created a new virtual machine in VirtualBox. Now you’re ready to install Windows 10 on your Mac.

Configure your virtual machine settings

After installing VirtualBox on your Mac, you need to configure your virtual machine settings before you can run Windows 10 on it. Here are the step-by-step instructions:

  1. Open VirtualBox and click the “Create” button in the top pane to create a new virtual machine.
  2. In the window that appears, enter a name for the virtual machine (for example, “Windows 10”) and select the operating system type “Microsoft Windows” and version “Windows 10 (64-bit)”.
  3. click on the “Next” button.
  4. On the next screen, select the amount of memory (RAM) you want to allocate for the virtual machine. It is recommended that you allocate at least 4 GB of memory for optimal Windows 10 performance.
  5. Click on the “Next” button.
  6. In the next screen, select the “Create virtual hard disk now” option and click on the “Create” button.
  7. Select the virtual hard disk type - “VDI (VirtualBox Disk Image)” and click on the “Next” button.
  8. Select the “Dynamic” option for the virtual hard disk and click on the “Next” button.
  9. On the next screen, enter a name for the virtual hard disk (for example, “Windows10”) and select its size (it is recommended to allocate at least 30 GB of free space).
  10. Click on the “Create” button.

Once these settings are complete, you will see the virtual machine (Windows 10) in the list of virtual machines in the VirtualBox program. Now you are ready to move on to the next step - installing Windows 10 on the virtual machine.

FAQ:

What operating system do I need to run a Windows 10 Virtual Machine on my Mac using VirtualBox?

To run a Windows 10 Virtual Machine on a Mac using VirtualBox, you will need a macOS operating system.

Which site can I download VirtualBox for Mac from?

You can download VirtualBox for Mac from the official VirtualBox website: https://www.virtualbox.org .

What are the minimum system requirements for a Mac to run Windows 10 with VirtualBox?

The minimum system requirements to run Windows 10 via VirtualBox on a Mac include the following: an Intel or AMD processor with virtualization support, 4GB of RAM, enough free hard drive space for installation, and Windows 10 image sizes.

Can I run Windows 10 on my Mac using programs other than VirtualBox?

Yes, you can use programs other than VirtualBox to run Windows 10 on a Mac, such as Parallels Desktop and VMWare Fusion. Each of them has different features and functionality, so choosing a program depends on your preferences and requirements.

See Also:

comments powered by Disqus

You May Also Like