
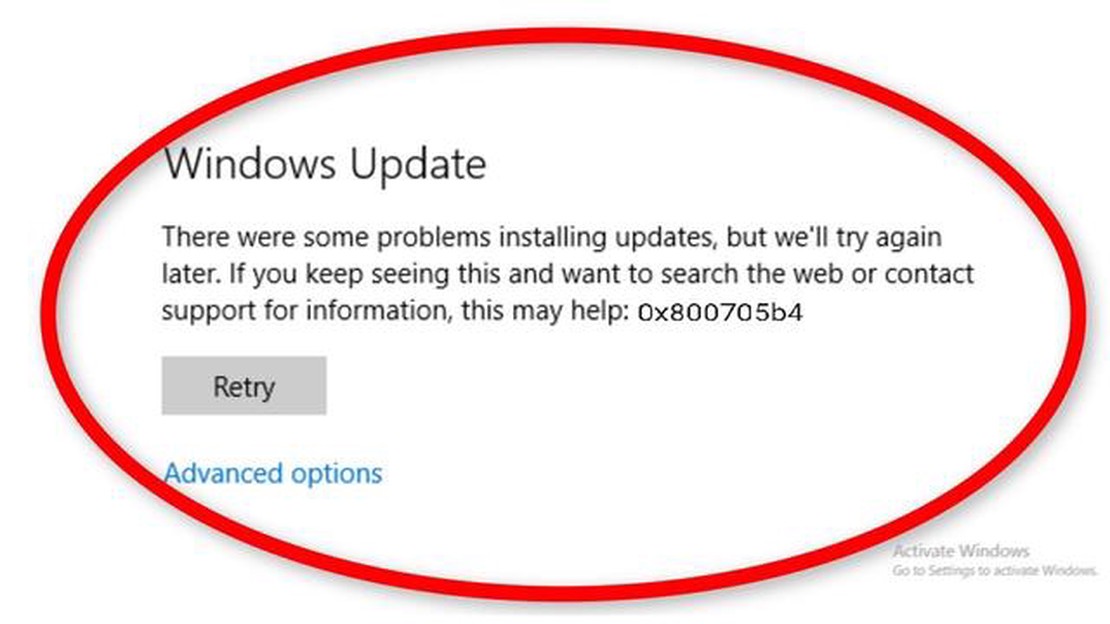

Simple Steps to Resolve Windows Update Error 0x800705b4 on Windows 10
How To Fix Windows Update Error 0x800705b4 On Windows 10 Windows Update is an essential feature of the Windows operating system that allows users to …
Read Article
Managing multiple email accounts can be a daunting task, especially if you have multiple Gmail accounts. However, with the right settings and instructions, you can organize all your emails and easily switch between different accounts without having to log in and out every time.
Here are some tips to help you manage multiple email accounts in Gmail. First, you can add all your email accounts to your main Gmail account so that you can receive and send all your emails from one place. To do this, open your Gmail settings and click on the “Accounts and Import” tab. Click on the “Add an email account” link and follow the instructions.
Second, you can set up filters and shortcuts to automatically sort emails into different folders or categories based on the sender’s address or keywords in the email. For example, you can create a filter to direct all emails from work to a separate folder or category. To do this, open your Gmail settings and click the “Filters and Address Blocking” tab. Click on the “Create a new filter” link and follow the instructions.
Finally, you can use the “Account Switching” feature in Gmail to quickly and easily access different accounts. Simply click on your profile in the top right corner of the screen and select the account you want to work with. You can also add a new account by clicking on the “Add Account” link. This will allow you to switch between accounts without having to log in and out each time.
Taking it all together, managing multiple email accounts in Gmail can be easy and convenient if you set up your accounts correctly and utilize the features available. Follow these tips and instructions to manage all of your email in Gmail with ease.
In Gmail, you can add multiple email accounts and manage them without leaving the app. This is handy for those who use multiple email addresses for different purposes, such as work and personal. In this article, we will look at how to add and manage multiple email accounts in Gmail.
Once you’ve added email accounts in Gmail, you can easily switch between them. Here’s how to do it:
In Gmail, you can perform the following actions for each email account:
Adding and managing multiple email accounts in Gmail makes it convenient to work with different email addresses from a single application. By following the above steps, you can easily add and switch between email accounts in Gmail.
If you have multiple email accounts in Gmail, there are some useful tips to help you manage them effectively:
With these tips, you’ll be able to manage multiple email accounts in Gmail more efficiently and won’t miss important messages.
Read Also: How to Fix Huawei P30: Youtube Keeps Crashing and Youtube Not Working on Huawei
Adding and deleting email accounts in Gmail for Android is a simple process. Follow these instructions to manage multiple email accounts in the Gmail app on your Android device:
By following these simple instructions, you will be able to add and delete email accounts in Gmail for Android with ease. Keep in mind that some email providers may have additional requirements or settings for adding email accounts. In such a case, it is recommended to refer to your email provider’s instructions or visit their website for detailed information on setting up email accounts in the Gmail app.
In Gmail, you have the option to set up notifications for each email account separately. This is especially useful if you manage multiple email accounts and only want to receive notifications for certain accounts. Here’s how to set up notifications for each email account in Gmail:
You’ve now set up notifications for each email account in Gmail. You will only receive notifications for the selected accounts, which will help you more easily navigate and keep track of different email accounts.
Read Also: How To Fix Netflix Not Working On LG TV - Quick Troubleshooting Guide
Gmail has many useful features that can help you manage your email messages from different accounts. One such feature is rules and filters, which allow you to automatically categorize and organize your incoming mail.
With rules and filters, you can easily separate mail from different accounts into different labels or folders, delete junk mail, automatically forward messages, or apply other actions to them.
To create a rule or filter in Gmail, follow these steps:
Once a filter is created, it will be automatically applied to new incoming messages. You can also apply the created filters to existing messages by selecting the appropriate action from the filters menu.
Now you have the ability to easily manage email messages from multiple Gmail accounts. With the help of rules and filters, you can organize your incoming mail so that it can be easily handled and not drowned among many other messages.
Yes, you can add multiple email accounts to Gmail. To do so, go to your account settings and select the “Accounts and Imports” section. Then, click on the “Add Account” button and follow the on-screen instructions.
To switch between email accounts in Gmail, you need to tap on your profile in the top right corner of the screen. Then select the desired account from the list to switch to it. You can also use the Ctrl+(account number) shortcuts to switch.
Yes, you can send emails from different email accounts in Gmail. When you write a new email, you’ll need to select the account you want to send the email from the Sender drop-down list. You can also change the account on an already written email by clicking on the “Sender” field and selecting the desired account.
Yes, you can set Gmail to automatically redirect emails from one account to another. To do this, you need to go to your account settings and select the “Filters and forwarding addresses” section. Then you should click on the “Create a new filter” button and specify the conditions for redirecting emails. After that you should specify the account to which you want to redirect emails and save your settings.
Yes, you can set up a separate signature for each email account in Gmail. To do so, you need to go to your account settings and select the “Accounts and Imports” section. Then, you need to click on the “Edit Info” button near the desired account and enter the desired signature. After that, you need to save the settings.
How To Fix Windows Update Error 0x800705b4 On Windows 10 Windows Update is an essential feature of the Windows operating system that allows users to …
Read Article
Set Up AirTrigger In ROG Phone 3 The ROG Phone 3 is a powerful gaming smartphone that comes with a unique feature called AirTrigger. AirTrigger is a …
Read Article
The best features of an online pdf program. PDF is one of the most popular document formats that provides data integrity and formatting when viewed on …
Read Article
Simple Steps to Enable Adaptive Fast Charging on Your Samsung Galaxy Tab S6 Adaptive Fast Charging is a feature on Samsung Galaxy Tab S6 that allows …
Read Article
Rarbg proxy sites and mirror sites daily updated. In the world of Internet there are many sites offering to download various files, but one of the …
Read Article
Top 5 gaming simulators on PS4 that you shouldn’t miss out on Simulation games on the ps4 console are extremely popular. They allow players to plunge …
Read Article


