


How to Optimize Google Chrome Download Speed in Windows 11 (Updated 2023)
How To Fix Google Chrome Slow Download In Windows 11 (Updated 2023) Google Chrome is one of the most popular web browsers in the world, known for its …
Read Article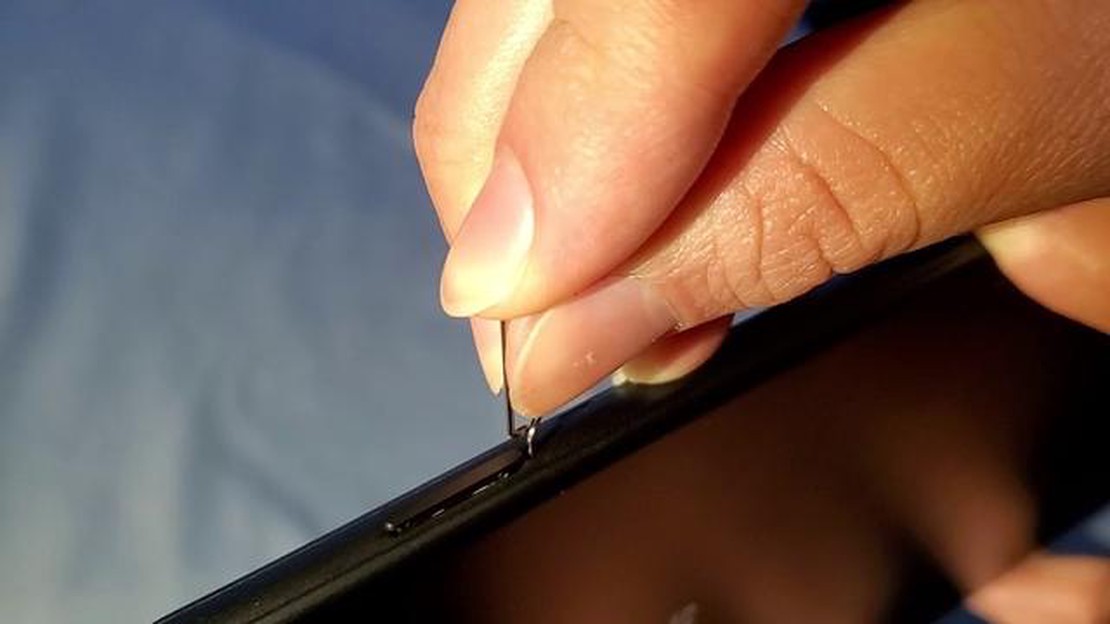
If you own a Samsung Galaxy Tab A 8.0 (2019) and want to use cellular data, you’ll need to insert a SIM card. The SIM card enables your tablet to connect to a mobile network and access the internet, send messages, and make phone calls.
Inserting or removing a SIM card on the Galaxy Tab A 8.0 (2019) is a relatively simple process. Here are the steps to follow:
Once you have inserted the SIM card, you can turn on your tablet and set it up to use cellular data. If you ever need to remove the SIM card, simply follow the same steps in reverse.
It’s important to note that the process may vary slightly depending on the exact model of the Galaxy Tab A 8.0 (2019) you own. Be sure to consult the user manual or visit Samsung’s official support website for more detailed instructions specific to your device.
Note: Before you begin, make sure your Galaxy Tab A 8.0 (2019) is powered off.
Note: If you ever need to remove the SIM card, repeat the above steps and remove the SIM card from the tray.
Congratulations! You have successfully inserted a SIM card on your Galaxy Tab A 8.0 (2019). Enjoy using your device!
To insert or remove a SIM card on the Galaxy Tab A 8.0 (2019) from Samsung, you need to first locate the SIM card slot. The SIM card slot is typically located on the side or at the top of the device, depending on the model.
Look for a small metal tray or slot with a small hole next to it. This is where the SIM card will be inserted or removed.
Note: Before inserting or removing a SIM card, make sure the device is powered off.
If you are unable to locate the SIM card slot, refer to the user manual or contact Samsung customer support for assistance.
Read Also: How to install homebrew on mac: step-by-step guide
To insert or remove a SIM card on your Samsung Galaxy Tab A 8.0 (2019), you will first need to open the SIM card slot cover. Follow the steps below to do this:
Note: Be careful not to apply too much pressure or force when lifting the cover to avoid damaging it.
Read Also: Clear Cache on Fire TV: Easy Step-By-Step Guide | WebsiteName
Now that you have successfully opened the SIM card slot cover, you can proceed with inserting or removing the SIM card as needed. Refer to the specific instructions provided by your service provider or SIM card manufacturer for the correct placement and handling of the SIM card.
To insert the SIM card on your Galaxy Tab A 8.0 (2019), follow these steps:
Note: Make sure you have the correct size of SIM card for your device. The Galaxy Tab A 8.0 (2019) uses a Nano-SIM card.
Disclaimer: The information in this article is based on the Galaxy Tab A 8.0 (2019) model. Steps may vary slightly for different models or versions of the device.
Removing the SIM card from your Galaxy Tab A 8.0 (2019) is a simple process that can be done in just a few steps. Here’s a step-by-step guide on how to remove a SIM card from your device.
That’s it! You have successfully removed a SIM card from your Galaxy Tab A 8.0 (2019). Remember to turn on your device again before using it.
The SIM card tray on the Galaxy Tab A 8.0 (2019) is located on the side of the tablet. It may be on the top, bottom, or on one of the sides, depending on the model. Look for a small hole or slot, and use the SIM ejector tool or a small paperclip to gently push the tray out.
Yes, you can use a nano SIM card in your Galaxy Tab A 8.0 (2019). The tablet supports nano SIM cards, which are the smallest type of SIM card available. Make sure you have a nano SIM card before inserting it into the tablet.
Yes, it is possible to remove a SIM card from your Galaxy Tab A 8.0 (2019) without the SIM ejector tool. If you don’t have the tool, you can use a small paperclip or a thin needle instead. Simply insert the paperclip or needle into the small hole or slot on the SIM card tray and push gently to eject the tray.
No, you do not need to power off your Galaxy Tab A 8.0 (2019) before inserting or removing a SIM card. However, it is recommended to turn off the tablet before removing the SIM card to avoid any potential issues or damage.
How To Fix Google Chrome Slow Download In Windows 11 (Updated 2023) Google Chrome is one of the most popular web browsers in the world, known for its …
Read Article
How To Fix It If Galaxy S22 Messages Keeps Stopping If you are a proud owner of the Samsung Galaxy S22 and have been experiencing issues with your …
Read Article
How To Fix Call Of Duty Warzone Dev Error 6164 | NEW in 2023 Are you a Call of Duty Warzone enthusiast who has been experiencing the frustrating “Dev …
Read Article
How to enable Developer Options in your Samsung Galaxy S8 and enable USB Debugging The Samsung Galaxy S8 is a powerful and feature-packed smartphone …
Read Article
How To Find Reel Drafts on Instagram in 2023 Instagram has become one of the most popular social media platforms globally, and its constantly evolving …
Read Article
12 anonymous apps for private web browsing In today’s information society, protecting personal privacy and anonymity on the intranet is becoming …
Read Article


