


Ethereum cryptocurrency: what it is and what advantages it offers
Cryptocurrency ethereum: what it is and what it is used for In today’s world, cryptocurrencies are one of the most discussed and evolving types of …
Read Article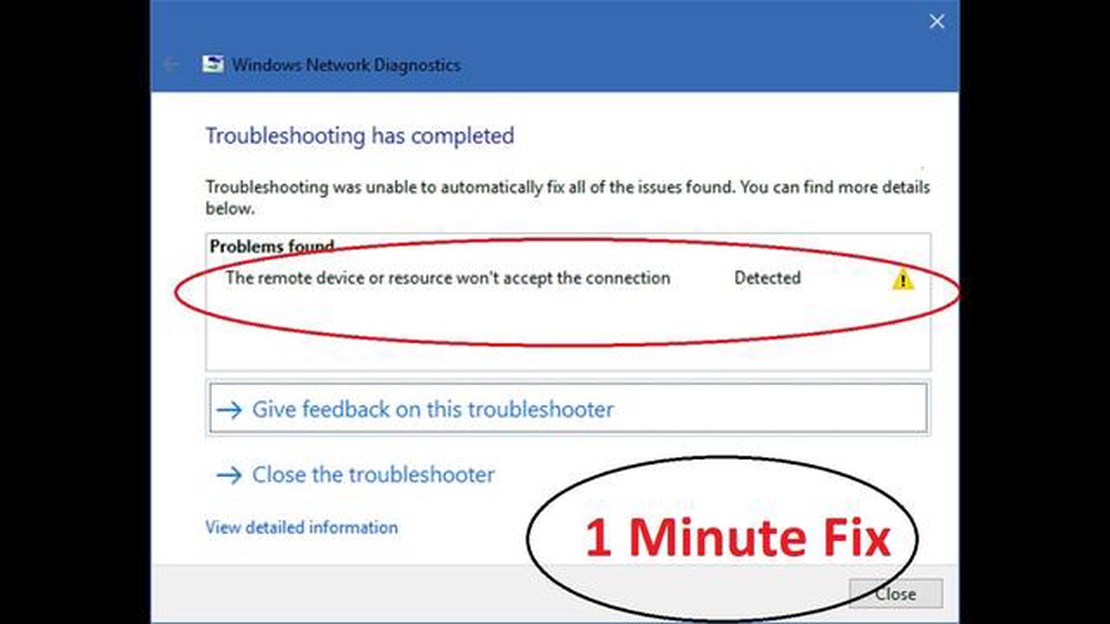
If you’re encountering the “The Remote Device Won’t Accept The Connection” error on your Windows 10 computer, you’re not alone. This error message typically appears when you’re trying to establish a remote connection to another device, such as a server or another computer, but for some reason, the connection cannot be established. While this error can be frustrating, there are several steps you can take to troubleshoot and fix the issue.
First, check your network connection. Make sure you’re connected to the internet and that your network settings are configured correctly. You can try resetting your network settings or restarting your router to see if that resolves the issue.
If your network connection is fine, the next step is to check the remote device you’re trying to connect to. Ensure that the device is powered on and connected to the network. If you’re trying to connect to a server, make sure the server is running and that the necessary services are active.
Another possible cause of the “The Remote Device Won’t Accept The Connection” error is a firewall or antivirus software blocking the connection. Temporarily disable any firewall or antivirus software on both your computer and the remote device and see if the error persists. If the error disappears, you’ll need to configure your security software to allow the remote connection.
If none of the above steps resolve the issue, you can also try restarting both your computer and the remote device. Sometimes a simple restart can fix temporary glitches or conflicts that may be causing the error.
By following these troubleshooting steps, you should be able to fix the “The Remote Device Won’t Accept The Connection” error on your Windows 10 computer and establish a successful remote connection. If the issue persists, you may need to seek further assistance from a knowledgeable IT professional.
The “The Remote Device Won’t Accept The Connection” error is a common issue encountered by Windows 10 users when trying to connect to a remote device or server. This error message indicates that the remote device or server is not accepting the connection request.
There are several possible reasons why this error occurs:
To fix the “The Remote Device Won’t Accept The Connection” error, you can try the following troubleshooting steps:
If none of these troubleshooting steps resolve the issue, it is recommended to seek further assistance from technical support or consult online forums for additional guidance.
When trying to connect to a remote device on Windows 10, you may encounter the error message “The Remote Device Won’t Accept The Connection.” This error can prevent you from establishing a successful connection and accessing the remote device. However, there are several methods you can try to resolve this issue. Here are some possible solutions:
If none of the above methods work, you may need to seek further assistance from technical support or consult online forums for additional troubleshooting steps specific to your remote device and network setup.
Read Also: 7 tips for creating a successful mobile app New development ideas
It’s important to note that remote connections can pose security risks. Always ensure that you are connecting to trusted devices and use appropriate security measures to protect your data.
If you are experiencing the “The Remote Device Won’t Accept The Connection” error on your Windows 10 computer, it could be due to network connection settings. Follow these steps to check and modify the network connection settings:
Once you have checked and modified the network connection settings, try connecting to the remote device again and check if the error is resolved.
If you are encountering the “The Remote Device Won’t Accept The Connection” error on Windows 10, you can try updating the Remote Desktop Protocol (RDP) settings. This can help resolve any compatibility issues with the remote device.
After following these steps, try connecting to the remote device again using the Remote Desktop app. This should update the RDP settings and potentially fix the “The Remote Device Won’t Accept The Connection” error on Windows 10.
If you are still encountering the “The Remote Device Won’t Accept The Connection” error on your Windows 10 computer, you can try disabling the firewall or antivirus software temporarily. Sometimes, these security programs can block the necessary network connections and prevent remote devices from connecting.
Read Also: How to Add Someone to a Group Text on Android: Step-by-Step Guide
Here’s how you can disable the firewall or antivirus software on Windows 10:
If you have antivirus software installed on your Windows 10 computer, you can also try temporarily disabling it to see if it resolves the error. The steps to disable antivirus software may vary depending on the software you are using, but generally, you can follow these steps:
Remember to re-enable your firewall or antivirus software once you have finished troubleshooting to ensure the ongoing security of your computer.
If disabling the firewall or antivirus software resolves the “The Remote Device Won’t Accept The Connection” error, you may need to adjust the settings or contact the software provider for further guidance on how to allow remote connections without compromising your security.
The error message “The Remote Device Won’t Accept The Connection” usually means that the device you are trying to connect to is not accepting incoming remote connections.
You might be getting the error message “The Remote Device Won’t Accept The Connection” if the device you are trying to connect to has remote connections disabled, or if there is a network issue preventing the connection.
To fix the “The Remote Device Won’t Accept The Connection” error, you can try enabling remote connections on the device you are trying to connect to, checking your network settings, or restarting your devices. You can also try disabling any firewall or antivirus software that might be blocking the connection.
If enabling remote connections and restarting devices doesn’t fix the “The Remote Device Won’t Accept The Connection” error, you can try resetting your network settings, updating your network drivers, or contacting your network administrator or the device manufacturer for further assistance.
No, the “The Remote Device Won’t Accept The Connection” error can occur on any Windows version that supports remote desktop connections. However, the steps to fix the error may vary slightly depending on the Windows version you are using.
The error message “The Remote Device Won’t Accept The Connection” typically occurs when a Windows 10 user is trying to establish a remote connection to another device, but the target device is refusing the connection request.
There are several steps you can take to fix “The Remote Device Won’t Accept The Connection” error on Windows 10. First, make sure the target device is turned on and connected to the network. Next, check if the remote desktop settings on the target device allow incoming connections. Additionally, ensure that the Windows Firewall is not blocking the connection. If necessary, you might need to configure port forwarding on your router. Finally, check if the remote device has any third-party security software installed that could be blocking the connection.
Cryptocurrency ethereum: what it is and what it is used for In today’s world, cryptocurrencies are one of the most discussed and evolving types of …
Read Article
GTA V Crashing In Windows 11 Quick and Easy Fix (Steam) Grand Theft Auto V (GTA V) is a popular video game that has captivated players around the …
Read Article
TCL Unveils New 98-Inch 4K TV at an Affordable Price Point TCL, a leading manufacturer of televisions, has just unveiled its latest innovation in the …
Read Article
Ultimate Guide: Troubleshooting Valorant Error Code VAN 152 (2023 Update) If you are a fan of the popular online game Valorant, then you may have …
Read Article
Speedtest App on Android Adds a New VPN Feature When it comes to testing your internet speed on your Android device, the Speedtest app has always been …
Read Article
Fix windows terminal not opening in windows 11 Windows terminal is one of the most important tools for working with Windows operating system. It …
Read Article


