


4 Best Book Writing Apps for Android in 2023
Top 4 Book Writing Apps for Android in 2023: Enhance Your Writing Experience with These Cutting-edge Apps In the age of smartphones and tablets, …
Read Article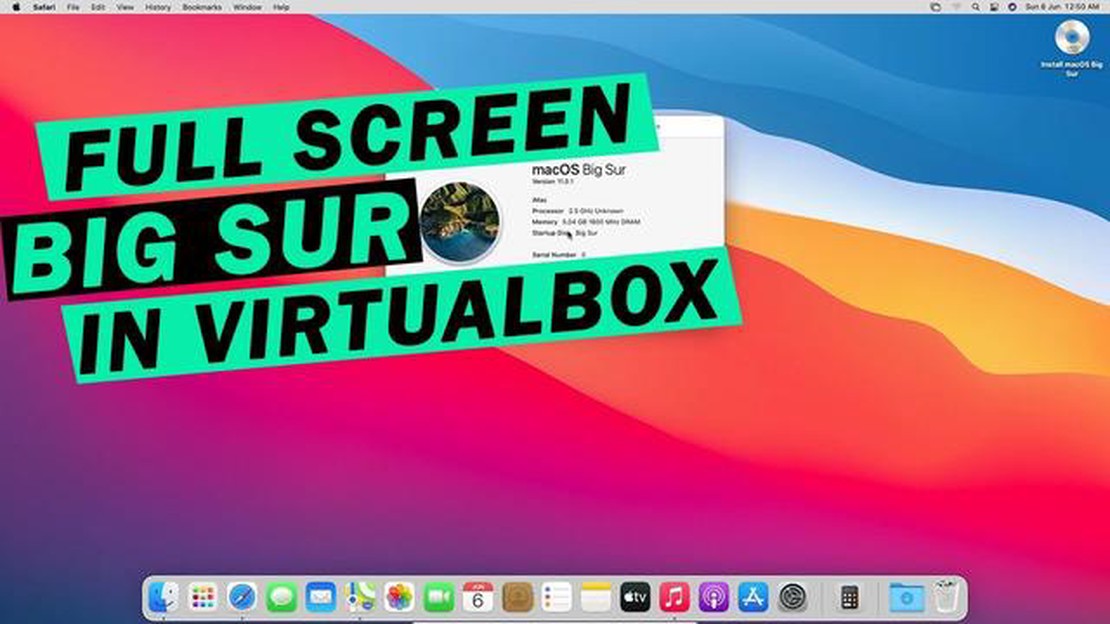
macOS Catalina is an operating system developed by Apple that offers many new features and improvements. However, if you are trying to use Catalina in VirtualBox, you may encounter a problem with the screen resolution. But don’t worry, in this article we will tell you how to easily fix this known limitation.
The first step to fix the screen resolution issue in Catalina in VirtualBox is to install VirtualBox guest add-ons. Guest add-ons are specialized software that provides additional features and functionality to a virtual machine.
To install guest add-ons, you need to start a virtual machine with Catalina in VirtualBox, and then select “Install Guest Add-ons” from the Devices menu. After that, follow the on-screen instructions to install the add-ons.
After installing the guest add-ons, restart the virtual machine. You will now be able to customize the screen resolution in Catalina. To do this, select “Show all resolutions” from the “Display” menu in the Catalina system settings. Then select the desired resolution and click “Apply”.
Congratulations! You have successfully fixed the screen resolution issue in macOS Catalina in VirtualBox. Now you can enjoy all the new features and enhancements of Catalina at full resolution.
Installing macOS Catalina in VirtualBox allows you to run Mac OS on your computer without having to purchase an Apple device. Here are step-by-step instructions to help you install macOS Catalina in VirtualBox.
macOS Catalina is an operating system developed by Apple. It offers many new features and improvements, but users sometimes encounter the problem of incorrect screen resolution when running a virtual machine in VirtualBox. In this instruction, let’s see how to fix this problem.
Step 1: Log into VirtualBox and select the desired virtual machine.
Step 2: Right click on the virtual machine and select “Settings”.
Step 3: In the window that opens, click on the “Screen” tab.
Step 4: Expand the “Controller Graphics” section and check the box next to “VBoxVGA Graphics Controller”.
Step 5: Select the “System” tab and go to the “Video Output” section.
Step 6: Check the box next to “Video Memory Capacity”, and set the video memory level of your choice.
Step 7: Click the “Apply” button, and close the “Settings” window.
Step 8: Start the virtual machine and check the screen resolution - it should be fixed.
Now you know how to change the screen resolution in macOS Catalina in VirtualBox and enjoy running the virtual machine with the correct resolution.
A virtual machine in VirtualBox is a convenient way to run an operating system on your computer without having to install it directly on your hard disk. However, sometimes users encounter screen resolution issues in VirtualBox, especially when using macOS Catalina. In this article, we will explain how to fix this problem.
Screen resolution issues in VirtualBox can be caused by several factors:
Read Also: How to Fix Samsung Galaxy J4 Black Screen of Death - Step-by-Step Guide
To fix screen resolution issues in VirtualBox in macOS Catalina, follow these steps:
The first step is recommended to update VirtualBox to the latest version. Then make sure that the guest add-ons are installed and up to date in the virtual machine.
Go to the virtual machine settings in VirtualBox and select the “Display” section. Make sure that the graphics controller is set to “VBoxSVGA” or “VBoxVGA”. Also set the maximum amount of video memory.
Inside the virtual machine, open the screen settings and select the resolution that matches your monitor. If necessary, also adjust the screen refresh rate.
Read Also: Top 11 Tablet with Stylus for 2023: Ultimate Guide and Reviews
After making all the necessary changes, restart the virtual machine and check if the screen resolution has changed.
By following the above steps, you should be able to fix the screen resolution issue in VirtualBox. If the problem persists, make sure that your system supports the installed virtual environment and do more research or ask for help from the VirtualBox community.
Virtual machines running macOS Catalina in VirtualBox may have an issue with incorrect screen resolution, which can make it difficult to use the operating system. These instructions will describe how to fix the screen resolution in macOS Catalina in VirtualBox.
Step 1: Make sure you have the latest version of VirtualBox installed. If not, update it to the latest version.
Step 2: Download and install the Guest Operating System Additions (Guest Additions) in your virtual machine. To do this:
Step 3: After rebooting the virtual machine, open a terminal in macOS Catalina and run the following command:
sudo nano /Library/Preferences/SystemConfiguration/com.apple.Boot.plist
You will need to enter the administrator password to continue.
Step 4: Add the following code to the file that opens:
Graphics Mode1920x1080x32
Here you can specify the desired screen resolution instead of “1920x1080x32” if it is different. For example, “1280x800x32”.
Step 5: Save your changes by pressing Control + X, then Y and Enter. Then reboot the virtual machine.
Step 6: After the reboot, the screen resolution should be corrected. If it is not, repeat the previous steps and make sure you have correctly specified the required resolution in step 4.
You should now be able to use macOS Catalina in VirtualBox with the correct screen resolution.
To fix the screen resolution in macOS Catalina in VirtualBox, you need to follow a few steps. First, install VirtualBox guest add-ons on the virtual machine. Then reboot the virtual machine and start macOS Catalina. Once the virtual machine has booted, open Terminal (Console) and run the following command: “sudo rm -rf /Library/Preferences/com.apple.windowserver.plist”. After that, reboot the virtual machine again and the screen resolution should be fixed.
To install VirtualBox Guest Additions on a virtual machine, first open the VirtualBox menu and select “Devices”. Then select “Insert Guest Additions CD Image” to load the guest additions CD image. After that, open Terminal in the virtual machine and run the command “cd /Volumes/VBOXADDITIONS_” and then “sudo ./VBoxDarwinAdditions.pkg”. Follow the installation wizard and reboot the virtual machine when finished.
If the screen resolution still does not change after installing VirtualBox guest add-ons, try the following steps. First, open the “Terminal” (Console) of the virtual machine and run the command “sudo nano /Library/Preferences/SystemConfiguration/com.apple.Boot.plist”. In the editor that opens, find the “Graphics Mode” line and replace the 800x600 value with the desired resolution (e.g. 1920x1080). Save the changes and reboot the virtual machine. This may be able to fix the screen resolution issue.
It is recommended to use a screen resolution that matches your physical monitor and at which you feel comfortable. It is generally recommended to use a resolution of 1920x1080, as this is the standard resolution for most monitors. However, depending on your personal preferences and the capabilities of your monitor, you may choose a different resolution that you prefer.
Top 4 Book Writing Apps for Android in 2023: Enhance Your Writing Experience with These Cutting-edge Apps In the age of smartphones and tablets, …
Read Article
How to create your own avatar/caricature on facebook. Social media plays a big role in our daily lives and Facebook is no exception. When you create …
Read Article
How To Fix TCL TV Is Frozen Having a frozen TCL TV can be frustrating, especially when you’re in the middle of watching your favorite show or movie. …
Read Article
All the gta vi rumors at a glance. Waiting for the next part of the popular series Grand Theft Auto (GTA) is always accompanied by a lot of rumors and …
Read Article
11 Best Fire Stick Apps in 2023 Looking for the best Fire Stick apps to enhance your streaming experience in 2023? We’ve got you covered! Whether …
Read Article
Best Time To Post On Facebook For Maximum Reach and Engagement Facebook is one of the most popular social media platforms, with billions of users …
Read Article


