


Epic Games Launcher LS-0009 Manifest Failed To Load Error - Troubleshooting Guide
Epic Games Launcher LS-0009 Manifest Failed To Load Error If you are an avid gamer, you might have encountered the LS-0009 Manifest Failed To Load …
Read Article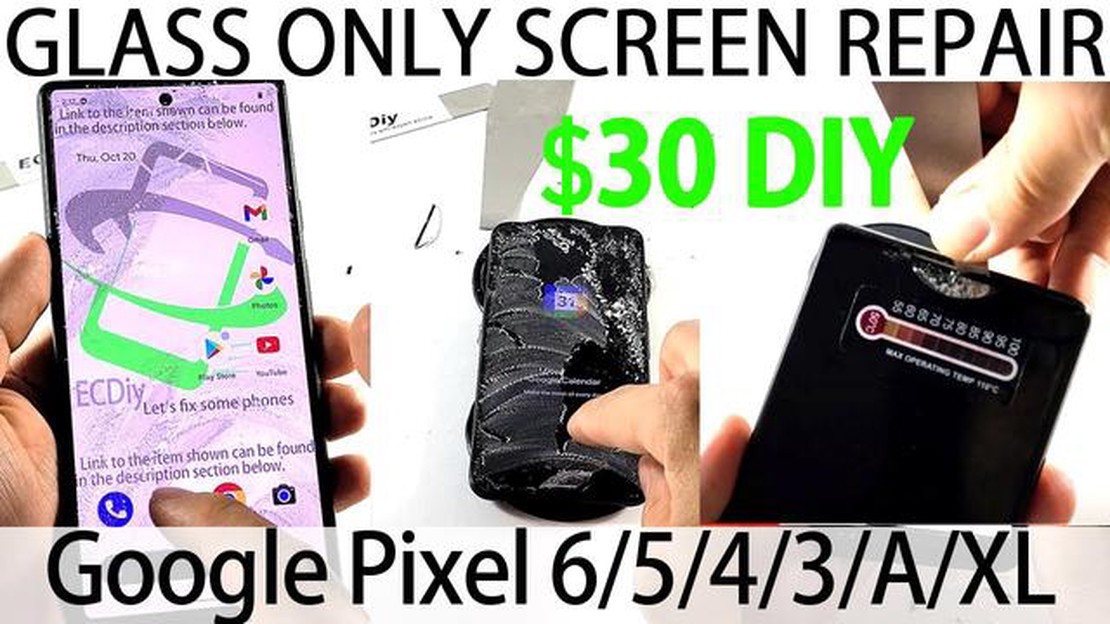
Accidents happen, and if you’ve found yourself with a cracked screen on your Google Pixel phone, don’t worry. You don’t have to replace your phone or live with a shattered display. In this step-by-step guide, we’ll show you how to fix a cracked screen on your Google Pixel phone.
Step 1: Assess the Damage
Before you start the repair process, carefully assess the damage to your Google Pixel’s screen. Determine the extent of the cracks and see if there are any loose pieces of glass. This will help you decide whether you can attempt the repair yourself or if you should seek professional help.
Step 2: Gather the Necessary Tools
To fix your cracked screen, you’ll need a few tools. First, make sure you have a replacement screen that is compatible with your Google Pixel phone model. You’ll also need a small screwdriver, a pry tool or plastic spudger, tweezers, and adhesive tape or glue.
Step 3: Disconnect the Battery
Before you start working on your phone, it’s important to disconnect the battery to avoid any potential shorts or damage. Use a small screwdriver or pry tool to carefully remove the back cover of your Google Pixel phone, and then disconnect the battery connector.
Step 4: Remove the Cracked Screen
Once the battery is disconnected, carefully remove the cracked screen from your Google Pixel phone. Use the small screwdriver or pry tool to gently lift the screen away from the phone’s frame. Be cautious not to damage any other components while doing this.
Step 5: Install the Replacement Screen
Take your new replacement screen and carefully align it with the phone’s frame. Gently press it down to secure it in place, making sure that it is properly seated. Use adhesive tape or glue to secure the screen if necessary.
Step 6: Reconnect the Battery and Test
Read Also: Borderlands 2 walkthrough: tips, hints and details on Wiki
Once the replacement screen is installed, reconnect the battery connector and carefully place the back cover back on your Google Pixel phone. Turn on your phone and test the new screen to ensure it is working properly.
Final Thoughts
Fixing a cracked screen on your Google Pixel phone may seem daunting, but with the right tools and careful steps, it is possible to repair it yourself. However, if you’re not confident in your abilities or the damage is extensive, it’s always best to seek professional help. Remember to take your time, follow these steps, and soon your Google Pixel phone will have a brand new screen.
A cracked screen on your Google Pixel phone can be frustrating and expensive to fix. However, with some patience and the right tools, you can fix it yourself. Here is a step-by-step guide on how to fix a cracked screen on your Google Pixel phone:
Note: If you are not confident in your ability to fix a cracked screen, it is recommended to take your phone to a professional repair service.
To fix a cracked screen on your Google Pixel phone, you will need to gather several tools before you can start the repair process. Here is a list of the tools you will need:
Read Also: Solved Samsung Galaxy S8+ Charging Another Device Error - Easy Fixes
Make sure you have all of these tools ready before you proceed with the screen repair. This will ensure that you have everything you need to complete the process smoothly.
Before attempting to fix the cracked screen on your Google Pixel phone, it is important to back up your data. This step is crucial to ensure that you do not lose any important information during the repair process.
Backing up your data can be done in a few different ways:
Regardless of the method you choose, it is important to ensure that your data is safely backed up before proceeding with the screen repair. This will give you peace of mind knowing that even if something goes wrong during the repair process, your data will not be lost.
Replacing the cracked screen on your Google Pixel phone is a delicate process and requires some technical skills. It’s advisable to seek professional help or follow a detailed tutorial with step-by-step instructions before attempting this repair yourself.
Here are the general steps involved in replacing the cracked screen:
Remember, this is just a general overview of the process, and it’s important to follow a detailed guide or tutorial specific to your phone model. If you’re not comfortable performing this repair yourself, it’s always best to seek professional help.
If your Google Pixel phone screen is cracked, you can follow these steps to fix it:
Yes, it is possible to fix a cracked screen on a Google Pixel phone by yourself if you have the right tools and follow the steps mentioned in the article.
To fix a cracked screen on a Google Pixel phone, you will need the following tools: a heat gun or hairdryer, a suction cup, a spudger or a plastic opening tool, a screwdriver, a replacement screen, and adhesive tape.
Yes, you can replace the screen of your Google Pixel phone without professional help if you carefully follow the step-by-step guide provided in the article and have the necessary tools.
Epic Games Launcher LS-0009 Manifest Failed To Load Error If you are an avid gamer, you might have encountered the LS-0009 Manifest Failed To Load …
Read Article
How To Hard Reset Your Hisense TV If you’re experiencing issues with your Hisense TV and traditional troubleshooting methods haven’t worked, a hard …
Read Article
The 5 best apps to improve mental health Mental health is becoming an increasingly important topic in our modern lives. More and more people are …
Read Article
Common Samsung Galaxy S7 Issues With Text Message Notifications and How to Fix Them Welcome to our troubleshooting guide for the Samsung Galaxy S7, …
Read Article
5 Best Speaker Docks For Your Phone in 2023 Are you tired of listening to music or watching videos on your phone with its tiny speakers? If so, a …
Read Article
14 Best Color Laser Printer for Photos in 2023 If you’re a photography enthusiast or a professional in need of high-quality prints, you know that not …
Read Article


