


What to Do If Your Garmin Fenix 5 Plus Isn't Updating: Troubleshooting Guide
What to do if your Garmin Fenix 5 Plus isn’t updating If you own a Garmin Fenix 5 Plus, you know how important it is to keep your smartwatch updated …
Read Article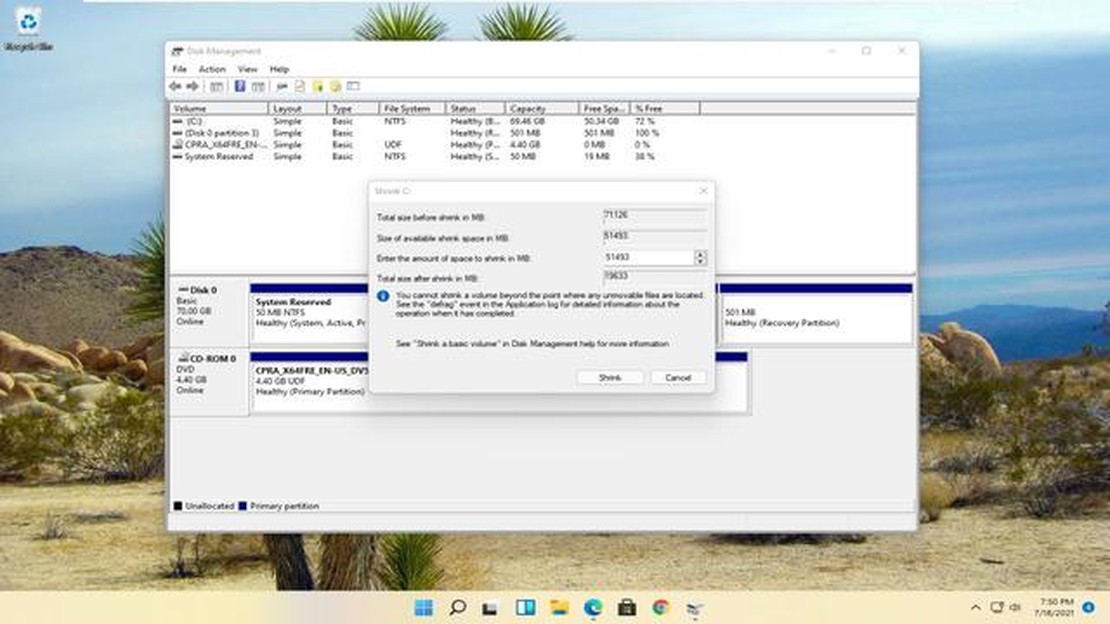
Remote Assistance in Windows 11 is the ability to get help from another user or provide help to another user over the internet. This feature can be useful in situations where you need to solve computer problems from a distance. However, in some cases, you may want to disable remote assistance connections for security or privacy reasons.
To disable remote assistance connections in Windows 11, follow these simple steps:
Remote Assistance will now be disabled and other users will not be able to connect to your computer. If you need to re-enable this feature, repeat the above steps and put the switch in the “Enabled” position.
As you can see, disabling or enabling remote assistance connections in Windows 11 is a very simple task and only takes a few minutes.
Remote Assistance in Windows 11 is designed to make it easier to maintain and customize your computer. If you want to disable or enable Remote Assistance, follow the instructions below.
After completing these steps, remote connections to your computer will be disabled.
After completing these steps, remote connections to your computer will be enabled.
Remote Assistance is a feature of the Windows 11 operating system that allows remote users to access your computer to provide technical support or perform certain tasks. However, if you don’t need this feature or want to improve your security, you can disable remote assistance.
Here’s how to disable remote assistance in Windows 11:
After following these steps, remote assistance will be completely disabled and other users will not be allowed to access your computer via remote management.
Disabling remote assistance can help improve the security of your system, especially if your computer is connected to a public network or used in a shared office.
Remote Assistance in Windows 11 allows other users to connect to your computer and provide you with technical support or help with problems. To enable remote help, follow these steps:
Read Also: The 10 best sites similar to Reddit: discover new platforms10. After selecting the remote assistance settings, click “Apply” and “OK” to save your changes.
Remote Assistance will now be enabled on your computer and other users will be able to connect to it for technical support or assistance.
Read Also: How To Troubleshoot OBS Studio Not Working In Windows 11 (Updated 2023)
Remote Assistance in Windows 11 allows users to share screens, control each other’s computer, and solve problems from afar. If you need to configure Remote Assistance settings in Windows 11, follow the instructions below.
Remote Assistance is now enabled in Windows 11 and can be used.
You can now receive or offer remote assistance in Windows 11 using the Remote Assistance settings.
Note that using remote help may require you to create a password for the user account, and may also require access permissions.
To disable remote assistance connections in Windows 11, follow these steps: 1. Open Settings from the Start menu. 2. Click on the System section. 3. From the list on the left, select “Remote Desktop”. 4. Toggle “Enable Remote Desktop” to the “Disabled” position. The remote assistance connection will now be disabled.
To enable remote assistance connections in Windows 11, follow the steps below: 1. Open Settings from the Start menu. 2. Click the System section. 3. From the list on the left, select “Remote Desktop”. 4. Toggle “Enable Remote Desktop” to the “Enabled” position. The remote assistance connection will now be enabled.
To find the “Remote Desktop” section in Windows 11 settings, open Settings from the Start menu, then select System from the list on the left. This opens a section with various settings, including “Remote Desktop.”
If you disable remote assistance in Windows 11, you will disable the ability to connect to your computer remotely to provide help or get help from other users. Disabling remote assistance will also disable the ability to use features related to remote desktop and remote access to your computer.
Using Remote Assistance in Windows 11 allows you to connect to your computer remotely to provide help or receive help from other users. This is useful when you need to solve a problem on your computer while in a different location. Remote Assistance allows you to access your desktop and control your computer remotely, saving you time and resources.
What to do if your Garmin Fenix 5 Plus isn’t updating If you own a Garmin Fenix 5 Plus, you know how important it is to keep your smartwatch updated …
Read Article
How to enable or disable supersampling in windows 11/10? Supersampling is a special mode of the Windows operating system that allows you to prioritize …
Read Article
How To Fix Xbox Series X Cannot Access Game Pass Problem If you’re experiencing issues with accessing Game Pass on your Xbox Series X, you’re not …
Read Article
Why are My PDFs Opening in Chrome? And How To Stop It PDF (Portable Document Format) files are widely used for sharing documents and forms across …
Read Article
How To Fix Dead By Daylight Keeps Crashing On PC Dead by Daylight is a popular multiplayer horror game that pits a ruthless killer against four …
Read Article
When will we see the new witcher 4? The events in CD Projekt RED’s popular Witcher video game series have been thrilling players for years. The …
Read Article


