


Fix the Samsung Galaxy S7 Not Receiving Text Messages Issue & Other Related Problems
Samsung Galaxy S7 Stopped Receiving Text Messages Issue & Other Related Problems The Samsung Galaxy S7 is a popular smartphone that offers a wide …
Read Article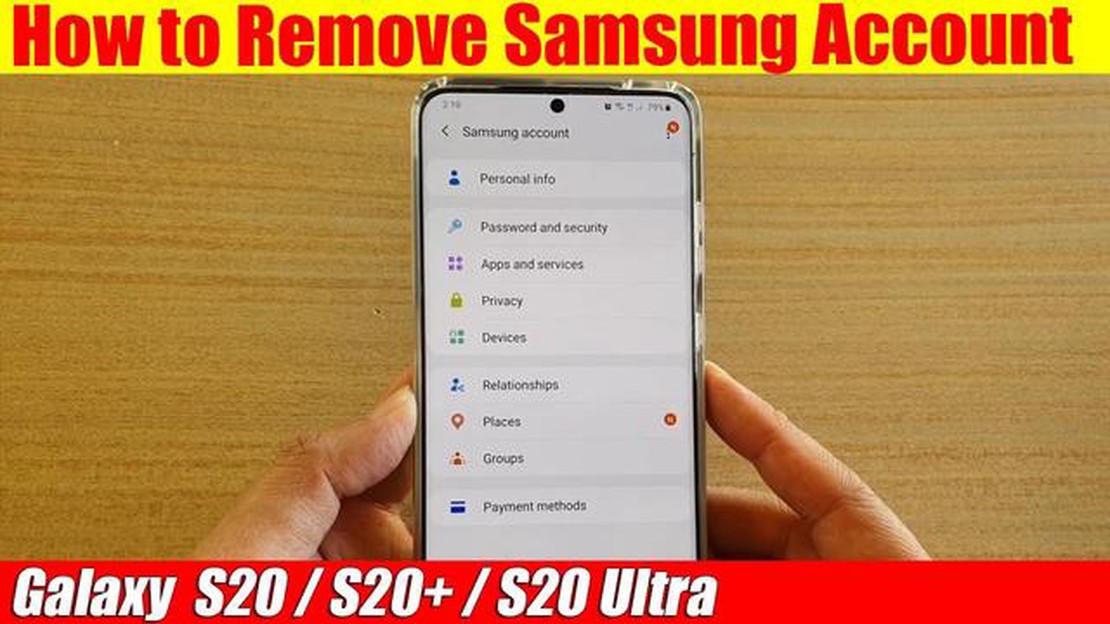
If you are a Samsung Galaxy S20 user, having a Samsung account can enhance your experience as it offers a range of features and services exclusive to Samsung device owners. A Samsung account allows you to sync and back up your data, access Samsung’s cloud storage, and easily manage your device settings and preferences.
In this step-by-step guide, we will walk you through the process of adding and removing a Samsung account on your Galaxy S20. Whether you want to create a new Samsung account or remove an existing one, we have got you covered.
Adding a Samsung Account:
Step 1: Open the Settings app on your Galaxy S20 by tapping the gear icon on the notification panel or by finding it in the app drawer.
Step 2: Scroll down and tap on “Accounts and backup.”
Step 3: Tap on “Accounts.”
Step 4: Select “Add account.”
Step 5: Choose “Samsung account” from the list.
Step 6: Follow the on-screen prompts to sign in with your existing Samsung account or create a new one.
Removing a Samsung Account:
Step 1: Open the Settings app on your Galaxy S20.
Step 2: Scroll down and tap on “Accounts and backup.”
Read Also: Step-by-Step Guide: How to Connect Airpods to Samsung TV EasilyStep 3: Tap on “Accounts.”
Step 4: Select your Samsung account from the list.
Step 5: Tap on the three-dot menu icon in the top-right corner.
Step 6: Choose “Remove account.”
By following these simple steps, you can easily add or remove a Samsung account on your Galaxy S20, allowing you to enjoy all the benefits and features offered by Samsung’s ecosystem.
A Samsung account is essential for accessing various services and features on your Galaxy S20 smartphone. Here is a step-by-step guide on how to add and remove a Samsung account on your device:
Read Also: How to Fix Battle Net Not Opening Error in Windows 10
Adding and removing a Samsung account on your Galaxy S20 is a simple process that allows you to access various Samsung services and features on your device.
To add or remove a Samsung account on your Galaxy S20, you will need to access the device’s Settings menu. Here are the steps to open Settings:
Once you have successfully opened the Settings menu on your Galaxy S20, you can proceed to the next step to add or remove your Samsung account.
Once you have unlocked your Galaxy S20 and are on the Home Screen, follow the steps below to access the “Accounts and Backup” settings:
By tapping on “Accounts and Backup,” you will be able to view and manage the various accounts linked to your Samsung Galaxy S20, as well as configure backup and restore settings.
Once you have accessed the Settings menu on your Samsung Galaxy S20, the next step is to select the Accounts option. Here’s how you can do it:
If you want to remove an existing account, simply tap on the account name in the list. This will open the account settings menu where you can find the option to remove the account.
By selecting the Accounts option, you can easily manage and add/remove accounts on your Samsung Galaxy S20.
In this step, we will guide you on how to add or remove a Samsung Account on your Galaxy S20 device. Follow the steps below:
By following these steps, you can easily add or remove a Samsung Account on your Galaxy S20 device. Having a Samsung Account allows you to access various Samsung services and features, including Samsung Cloud, Find My Mobile, and more. Keep in mind that removing a Samsung Account will also remove any data associated with that account from your device.
Samsung Galaxy S7 Stopped Receiving Text Messages Issue & Other Related Problems The Samsung Galaxy S7 is a popular smartphone that offers a wide …
Read Article
Best video processing tool to quickly edit, resize and convert 4k videos. 4K videos are becoming increasingly popular among users due to their …
Read Article
Multiversus crossplay how to turn on/off In modern games more and more attention is paid to the crossplay feature, which allows players from different …
Read Article
How To Play Among Us On PC For Free | BlueStacks Emulator | NEW! Among Us, the popular multiplayer game, has taken the gaming world by storm. With its …
Read Article
How To Fix Samsung Smart TV Green Screen Issue Is your Samsung Smart TV displaying a green screen instead of the usual vibrant colors? Don’t worry, …
Read Article
How to permanently block a website in 2023 The Internet is an integral part of our lives, but there are often situations when some sites become a …
Read Article


