


How to Solve the Problem of LG TV WiFi Keeps Turning Off
How To Fix LG TV WiFi Keeps Turning Off If you have an LG TV and you’re experiencing the frustration of constantly having your WiFi connection turned …
Read Article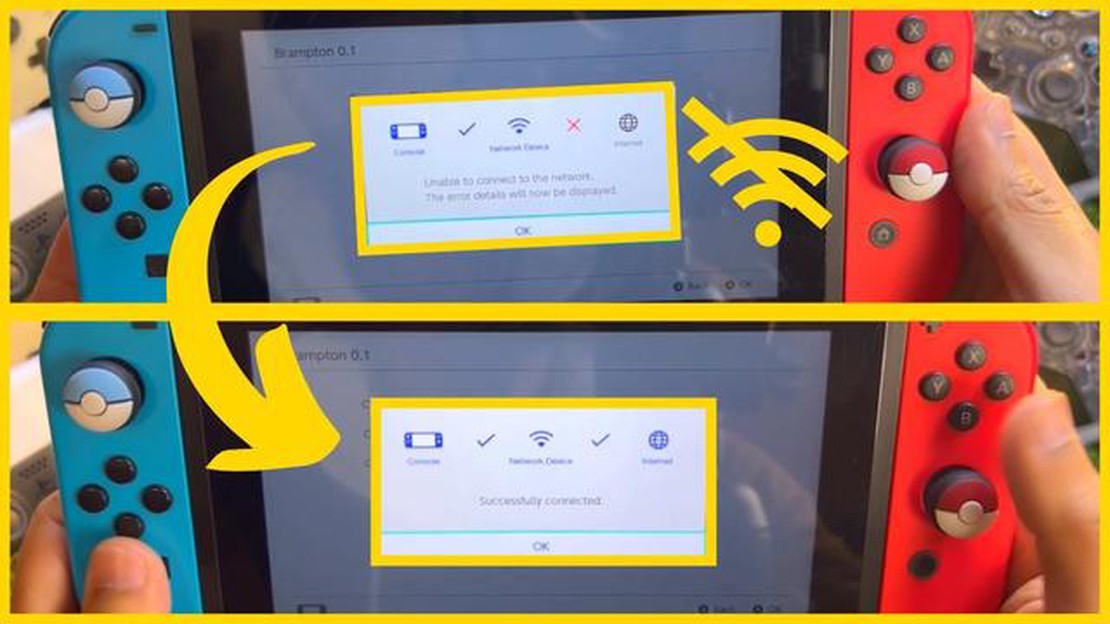
Are you a proud owner of a Nintendo Switch console and looking to change your WiFi password? Well, you’ve come to the right place! In this step-by-step guide, we will walk you through the process of changing your Nintendo Switch WiFi password in 2023. Whether you want to enhance the security of your network or simply update your password, we’ve got you covered.
Changing the WiFi password on your Nintendo Switch is a straightforward process that can be done in just a few minutes. By updating your password regularly, you can protect your network from potential security threats and ensure that only authorized devices can connect to your Switch.
To change your Nintendo Switch WiFi password, you will need to access the settings menu on your console. From there, you can navigate to the network settings and modify your password. It’s important to note that changing the WiFi password on your Nintendo Switch will not affect the passwords for other devices connected to your network.
So, if you’re ready to take control of your Nintendo Switch’s WiFi security, let’s dive into the step-by-step guide and change your WiFi password in 2023! Follow the instructions carefully, and you’ll have a new password set up in no time.
Changing the WiFi password on your Nintendo Switch is a simple process. Follow these steps to change your WiFi password:
Your Nintendo Switch will now be connected to the WiFi network using the new password. Make sure to update the password on any other devices that use the same WiFi network.
It’s important to note that this guide is based on the current version of the Nintendo Switch software. If there are any updates or changes to the system settings in future versions, the steps may vary slightly. Always refer to the official Nintendo documentation or support resources for the most up-to-date information.
Read Also: Steam: fixed pending transaction bug - you can buy games again
To change your Nintendo Switch WiFi password, you’ll first need to access the WiFi settings on your console. Follow these steps:
After following these steps, your Nintendo Switch should be connected to the WiFi network with the new password. Remember to reconnect any other devices that use the same WiFi network with the updated password.
Once you have accessed the settings menu on your Nintendo Switch, it’s time to locate the WiFi password option. Follow the steps below to find it:
You have successfully located the WiFi password option on your Nintendo Switch. Now, let’s proceed to the next step to change your WiFi password.
Changing your Nintendo Switch’s WiFi password is a simple process that can be done in a few easy steps. Follow the instructions below to change your WiFi password:
Once you have completed these steps, your Nintendo Switch will be connected to the WiFi network using the new password. It is important to note that changing your WiFi password may require you to update the password on any other devices that are connected to the network.
Read Also: Top 10 Time Lapse Cameras of 2023: Capture Stunning Moments with the Best
To change your Nintendo Switch WiFi password, go to the System Settings menu, select Internet, and then select Internet Settings. From there, select your current WiFi network and then select Change Settings. Enter the new password and confirm the changes.
If you forgot your current WiFi password, you will need to reset your router or access point to regain access to your WiFi network. Once you have reset your router, you can set up a new WiFi password and connect your Nintendo Switch to the network using the newly created password.
There could be several reasons why you might need to change your Nintendo Switch WiFi password in 2023. For example, if you suspect that someone has gained unauthorized access to your WiFi network, changing the password can help improve your network security. Additionally, if you have recently upgraded your router or made changes to your network, you may need to update the WiFi password on your Nintendo Switch to regain internet access.
No, to change the WiFi password on your Nintendo Switch, you will need to disconnect from the current network and reconnect using the new password. This is because the WiFi password is used to authenticate and connect to the network, so it needs to be updated in order for your Nintendo Switch to access the internet.
If your Nintendo Switch is not connecting to WiFi after changing the password, there are a few troubleshooting steps you can try. First, make sure that you have entered the new password correctly. Check for any typos or capitalization errors. If the password is correct, try restarting your Nintendo Switch and power cycling your router. You may also need to update the WiFi settings on your Nintendo Switch by selecting the network and choosing “Change Settings” to re-enter the new password.
You can change your Nintendo Switch WiFi password by going to the System Settings, selecting Internet, choosing your WiFi network, and then selecting Change Settings. From there, you can enter your new WiFi password and save the changes.
How To Fix LG TV WiFi Keeps Turning Off If you have an LG TV and you’re experiencing the frustration of constantly having your WiFi connection turned …
Read Article
How To Fix Disney Plus Not Working On Hisense TV If you own a Hisense TV and are experiencing issues with Disney Plus not working, you’re not alone. …
Read Article
Simple secrets to maintaining a clutter-free study space A study space is where knowledge is learned and shared. It can be a school classroom, a …
Read Article
Curious how bitcoin evades taxes Bitcoin is the most popular and decentralized cryptocurrency today. Its appeal lies in its anonymity and lack of …
Read Article
How to Fix The Last of Us Part 1 Compiling Shaders Issue If you’re a fan of The Last of Us Part 1 and have been experiencing issues with shaders …
Read Article
Is it relevant that bitcoins are a worthy choice for any business organization? Bitcoins are widely recognized as one of the leading digital assets …
Read Article


