


How to solve the problem with logging out of Google Chrome
(How to) fix chrome exit problem Google Chrome is one of the most popular browsers, used by millions of users around the world. However, like any …
Read Article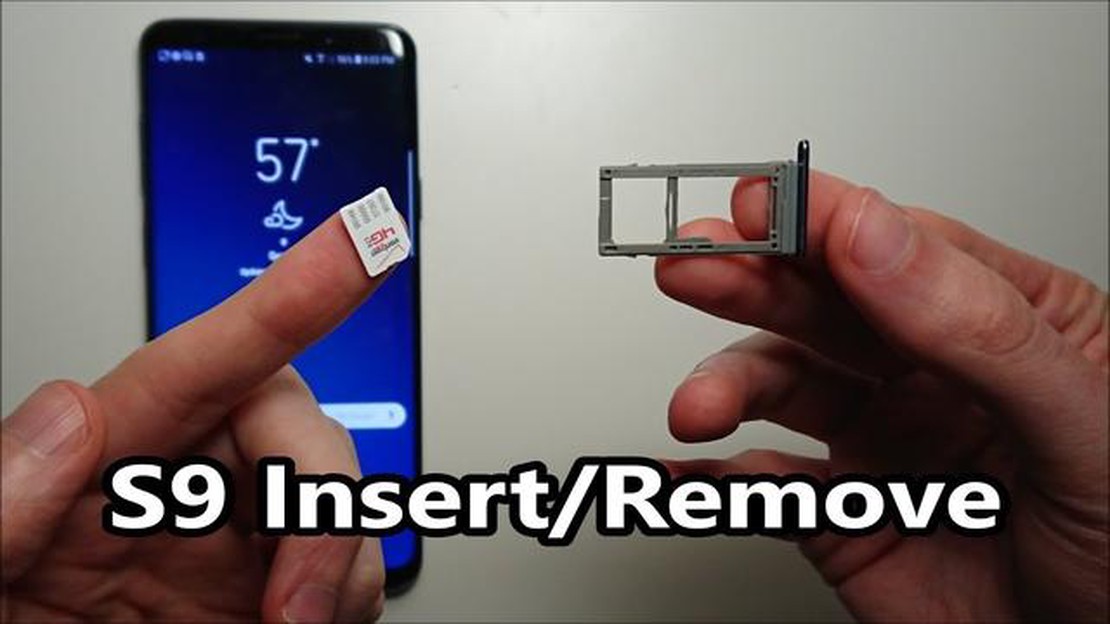
Welcome to our guide on how to insert or remove an SD card for the Samsung Galaxy S9. The Galaxy S9 offers expandable storage via an SD card slot, allowing you to increase the device’s storage capacity. Whether you need more space for your photos, videos, or apps, adding an SD card can be a simple and efficient solution. In this guide, we will walk you through the steps to insert or remove the SD card on your Galaxy S9.
To insert an SD card into your Galaxy S9, follow these steps:
Your Galaxy S9 will then recognize the SD card and you can start using it to store and access your files.
If you need to remove the SD card from your Galaxy S9, follow these steps:
It is important to properly eject the SD card before removing it to avoid any data loss or corruption. Once the tray is securely in place, your Galaxy S9 will no longer recognize the SD card.
Read Also: Fortnite won't launch on Windows 10: fixes that actually work
Adding or removing an SD card for your Samsung Galaxy S9 is an easy process that can be done in just a few steps. By following this guide, you can expand your device’s storage capacity and have more space for all your files.
If you want to expand the storage capacity of your Galaxy S9, you can easily do so by inserting an SD card. Here’s a simple step-by-step guide on how to insert or remove an SD card for your Galaxy S9:
That’s it! You have successfully inserted or removed an SD card for your Galaxy S9. Now you can enjoy additional storage capacity for your photos, videos, and other files.
Follow these simple steps to insert or remove an SD card for your Galaxy S9:
That’s it! You have successfully inserted or removed an SD card for your Galaxy S9. Enjoy your expanded storage!
To insert an SD card into your Galaxy S9, you need to locate the SIM card and memory card tray on the top edge of the phone. Use the ejection tool or a paperclip to gently push into the small hole next to the tray and release it. Then, carefully pull out the tray. Place the SD card into the tray, making sure the gold contacts are facing down. Finally, reinsert the tray into the phone.
Read Also: How to delete photos from Instagram: step-by-step instructions
The Galaxy S9 supports microSD cards up to a capacity of 400GB. This means you can use any microSD card with a storage capacity up to 400GB in your Galaxy S9. It’s important to note that using a microSD card with a higher capacity than the phone’s internal storage capacity will not increase the phone’s overall storage capacity.
To remove an SD card from your Galaxy S9, you need to locate the SIM card and memory card tray on the top edge of the phone. Use the ejection tool or a paperclip to gently push into the small hole next to the tray and release it. Then, carefully pull out the tray. Remove the SD card from the tray by gently pushing it out or using your fingers. Finally, reinsert the empty tray into the phone.
If you remove an SD card from your Galaxy S9 without ejecting it properly, it could potentially cause data corruption or loss. Ejecting the SD card ensures that all data on the card is safely closed and that the card is ready to be removed. Removing the card without ejecting it first can interrupt the data transfer process and lead to file errors or data fragmentation on the card. It is always recommended to properly eject the SD card before removing it from the phone.
(How to) fix chrome exit problem Google Chrome is one of the most popular browsers, used by millions of users around the world. However, like any …
Read Article
How To Pair A PS4 Wireless Controller With Galaxy S10 If you are a proud owner of a Samsung Galaxy S10 smartphone and love gaming, you might want to …
Read Article
5 Best Smart Speaker With Screen Display in 2023 Smart speakers have revolutionized the way we interact with our homes, and now, with the addition of …
Read Article
How To Fix Fitbit Charge 5 heart rate not showing Issue Fitbit Charge 5 is an advanced fitness tracker that provides users with valuable information …
Read Article
Cayo perico island in gta online. Cayo Perico Island is a new game location added to the popular game GTA Online. This island offers players more …
Read Article
How to Fix Roblox stopped responding error in Android 11 If you’re an Android user and a fan of Roblox, you may have encountered the frustrating …
Read Article


