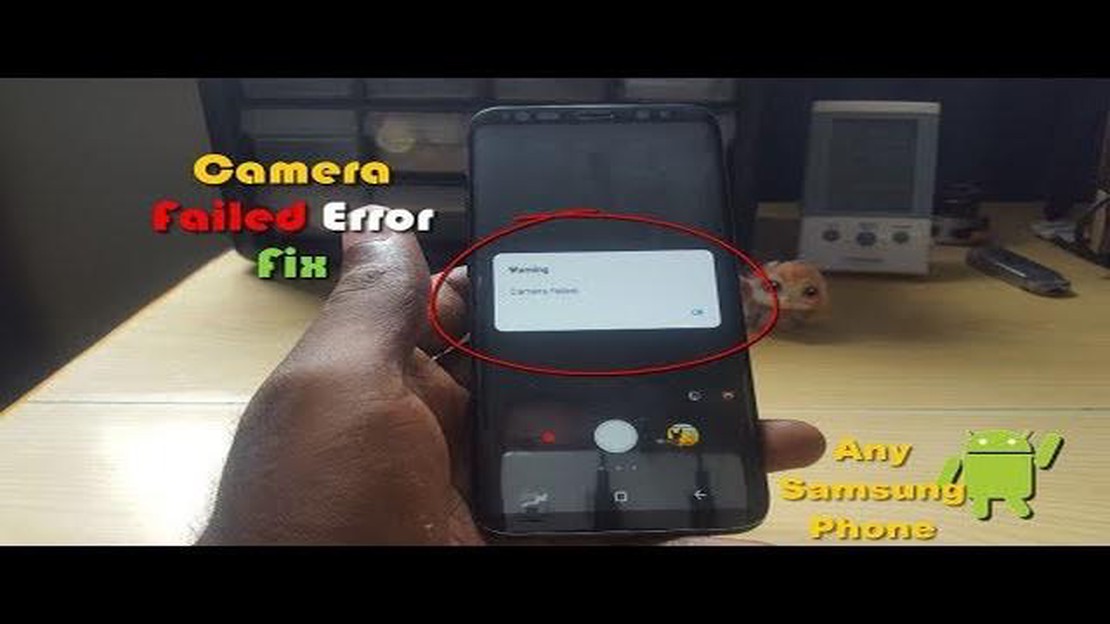
Samsung Galaxy J7 pops up “Warning: Camera failed” error when camera is opened (Troubleshooting Guide)
If you own a Samsung Galaxy J7 smartphone and recently encountered a “Warning: Camera failed” error, you’re not alone. Many users have reported facing this frustrating issue where the camera simply refuses to work, displaying an error message instead. Fortunately, there are several troubleshooting steps you can take to fix this issue and get your camera up and running again.
One possible cause of the “Warning: Camera failed” error is a software glitch or a conflict with other apps. In such cases, a simple restart of your device might solve the problem. Try turning off your Samsung Galaxy J7, wait for a few seconds, and then turn it back on. If the error persists, proceed to the next troubleshooting step.
Table Of Contents
If a restart doesn’t solve the issue, you can try clearing the cache and data of your camera app. To do this, go to Settings, Apps, and find your camera app among the list of installed apps. Tap on the camera app, and you’ll see options to clear cache and clear data. Start with clearing the cache, and if that doesn’t work, try clearing the data. Keep in mind that clearing data will delete any custom settings you have made in the app, so be prepared to set them up again.
If clearing the cache and data of the camera app doesn’t resolve the issue, you can try updating the software on your Samsung Galaxy J7. Manufacturers often release software updates that fix bugs and improve performance, so it’s worth checking if there’s an update available for your device. To do this, go to Settings, tap on About phone or About device, and look for the Software update option. If an update is available, follow the prompts to download and install it.
If none of the above troubleshooting steps work, you may need to consider a factory reset of your Samsung Galaxy J7. Factory resetting your device will erase all data and settings, so make sure to back up important files before proceeding. To perform a factory reset, go to Settings, tap on General Management, select Reset, and choose Factory data reset. Follow the on-screen prompts to complete the reset process.
By following these troubleshooting steps, you should be able to fix the “Warning: Camera failed” error on your Samsung Galaxy J7. If the issue persists, it’s advisable to seek professional help or contact the manufacturer’s customer support for further assistance.
Samsung Galaxy J7 Camera Error: How to Fix “Warning: Camera failed” Issue
If you are experiencing the “Warning: Camera failed” error on your Samsung Galaxy J7, you are not alone. This issue can be frustrating, but there are a few troubleshooting steps you can take to fix it.
Restart your phone: Sometimes a simple restart can resolve the issue. Press and hold the power button, then select “Restart” from the options that appear.
Clear camera cache and data: Go to Settings and select “Apps” or “Application Manager”. Locate the camera app and tap on it. Select “Storage” and then tap on “Clear cache” and “Clear data”. This will reset the camera app and may help fix the error.
Update camera app: Check if there is an update available for the camera app. Go to the Google Play Store, search for the camera app, and if there is an update available, tap on “Update”. Updating the app may fix any bugs or issues causing the camera error.
Safe mode: Restart your phone and when the Samsung logo appears, press and hold the volume down button until the phone finishes restarting. Your phone will boot up in safe mode. In safe mode, only pre-installed apps will be active. If the camera works fine in safe mode, then a third-party app may be causing the error. Uninstall recently installed apps one by one to identify the problematic app.
Factory reset: If none of the above steps work, you can try performing a factory reset. Keep in mind that a factory reset will erase all data on your phone, so make sure to backup important files first. To perform a factory reset, go to Settings, select “Backup and reset”, then tap on “Factory data reset”. Follow the on-screen instructions to complete the process.
If the camera error still persists after trying all of these troubleshooting steps, it is recommended to contact Samsung support or visit a service center for further assistance.
Troubleshooting Guide: Steps to Fix Samsung Galaxy J7 Camera Failed Error
If you’re experiencing the “Camera failed” error on your Samsung Galaxy J7, it can be frustrating and prevent you from capturing important moments. However, there are several troubleshooting steps you can try to fix this issue. Follow the steps below to resolve the camera failed error on your Galaxy J7.
Restart your phone: Sometimes, a simple restart can solve the camera failed error. Press and hold the power button on your Galaxy J7 and select “Restart” from the options that appear.
Clear camera cache and data: Go to “Settings” on your Galaxy J7 and select “Apps” or “Application Manager”. Scroll down and tap on “Camera”. Then, tap on “Storage” and select “Clear cache” and “Clear data”. Restart your phone and check if the error is resolved.
Update the camera app: Open the Google Play Store on your Galaxy J7 and search for the camera app. If an update is available, tap on “Update” to install the latest version of the camera app. Restart your phone and check if the error persists.
Start in Safe Mode: Boot your Galaxy J7 into Safe Mode to determine if a third-party app is causing the camera failed error. Press and hold the power button until the power-off menu appears. Then, press and hold the “Power off” option until you see the “Reboot to safe mode” prompt. Tap “OK” to enter Safe Mode. If the camera works fine in Safe Mode, it means a third-party app is causing the issue. Uninstall recently installed apps until you find the culprit.
Reset camera settings: Open the camera app on your Galaxy J7 and tap on the gear icon or settings icon. Look for the “Reset” or “Restore defaults” option and tap on it. Confirm the action to reset the camera settings. Restart your phone and check if the error is resolved.
Factory reset: If none of the above steps work, you can perform a factory reset on your Galaxy J7. Before doing this, make sure to backup your important data as a factory reset will erase all data on your phone. Go to “Settings” and select “Backup & reset”. Tap on “Factory data reset” and follow the on-screen instructions to reset your phone to its original settings.
After performing these troubleshooting steps, the camera failed error should be resolved on your Samsung Galaxy J7. If the issue still persists, you may need to contact Samsung support or bring your phone to a service center for further assistance.
Common Causes of Samsung Galaxy J7 Camera Failed Error
When encountering the “Camera failed” error on your Samsung Galaxy J7, there are several common causes that you should consider:
Hardware Issues: The error message might indicate a problem with the camera hardware itself. It could be due to a faulty camera module or damaged camera lens.
Software Glitches: There might be certain software glitches or conflicts that are causing the camera to fail. This could be due to a software update, recently installed apps, or system inconsistencies.
Insufficient Storage: If your device’s storage is full or close to full, it can result in camera errors. The camera app requires sufficient storage space to save photos and videos.
Corrupted App Data: Over time, the camera app’s data and cache files may become corrupted, causing the camera to fail. This can happen due to improper shutdowns, app crashes, or other software issues.
Outdated Software: If your device’s software is outdated, it may not be fully compatible with the camera app, leading to errors and failures.
By identifying the possible causes of the “Camera failed” error on your Samsung Galaxy J7, you can troubleshoot and resolve the issue more effectively. Keep these common causes in mind when attempting to fix the error and try the suggested solutions based on the specific cause identified.
How to Prevent Samsung Galaxy J7 Camera Failed Error
If you own a Samsung Galaxy J7 smartphone and frequently encounter the “Camera failed” error, there are a few preventive measures you can take to avoid this issue. Here are some tips to help you prevent the camera failed error on your device:
Keep your device updated: Regularly check for software updates on your Samsung Galaxy J7 and install them. Manufacturers often release bug fixes and improvements that can help resolve camera issues.
Clear cache and data: Periodically clear the cache and data of your camera app to ensure smooth functioning. To do this, go to Settings > Apps > Camera > Storage > Clear cache/data.
Avoid third-party camera apps: While there are many third-party camera apps available, it is recommended to use the default camera app on your Galaxy J7. Third-party apps may not be optimized for your device and can cause compatibility issues.
Restart your device: If you encounter the camera failed error, try restarting your Samsung Galaxy J7. A simple restart can help resolve temporary glitches and restore proper camera functionality.
Check for hardware damage: Inspect your device’s camera lens for any physical damage, such as scratches or cracks. In case of damage, it is advisable to take your device to an authorized service center for repair.
Avoid extreme temperatures: Exposure to excessive heat or cold can negatively affect your device’s camera performance. Avoid using the camera in extreme weather conditions to prevent the camera failed error.
Avoid resource-intensive apps: Some resource-intensive apps running in the background can interfere with the camera’s functionality. Close unnecessary apps or restart your device to free up resources and ensure optimal camera performance.
Perform a factory reset: If all else fails and the camera failed error persists, you can try performing a factory reset on your Samsung Galaxy J7. Make sure to back up your data before proceeding, as a factory reset will erase all your data and settings.
By following these preventive measures, you can minimize the chances of encountering the camera failed error on your Samsung Galaxy J7 and enjoy a seamless camera experience.
Contact Support for Samsung Galaxy J7 Camera Failed Error
If you are encountering the “Warning: Camera failed” error on your Samsung Galaxy J7, here are some troubleshooting steps you can try to resolve the issue. However, if none of these steps work, it is advisable to contact Samsung support for further assistance.
Restart your phone: Begin by restarting your Samsung Galaxy J7. Sometimes, a simple restart can help resolve temporary software glitches that may be causing the camera error.
Clear cache and data: Go to the settings of your device, tap on “Apps” or “Application Manager,” find the camera app, and select it. Then, tap on “Storage” and choose the options to clear cache and data. This will reset the camera app to its default settings.
Update the camera app: Ensure that your camera app is up to date. Check the Google Play Store for any available updates. Updating the app can often fix bugs and improve its performance.
Disable third-party camera apps: If you have installed any third-party camera apps, try disabling or uninstalling them. Sometimes, conflicts between different camera apps can cause camera errors.
Check for system updates: Make sure that your Samsung Galaxy J7 is running the latest software version available. System updates often include bug fixes and improvements that can resolve camera issues.
Perform a factory reset: If all else fails, you can try performing a factory reset on your device. This will erase all data and settings, so make sure to back up any important files beforehand. To perform a factory reset, go to the settings of your device, tap on “Backup & reset,” and choose the option to reset your device to factory settings.
If none of these troubleshooting steps work, it is recommended to contact Samsung support for further assistance. They will be able to provide you with more specialized guidance and help diagnose any underlying hardware or software issues causing the camera failed error on your Samsung Galaxy J7.
5 Best Free VPN For Ubuntu If you’re using Ubuntu as your operating system, you know how important it is to protect your online privacy and security. …
5 Best Car Chargers For OnePlus 6T Top 5 Car Chargers for OnePlus 6T - Ultimate Charging Solutions
Table Of Contents Top 5 Car Chargers for OnePlus 6T …