Learn How to Easily Flash Your Galaxy Note 2

post-thumb

How to Flash Galaxy Note 2 Easily

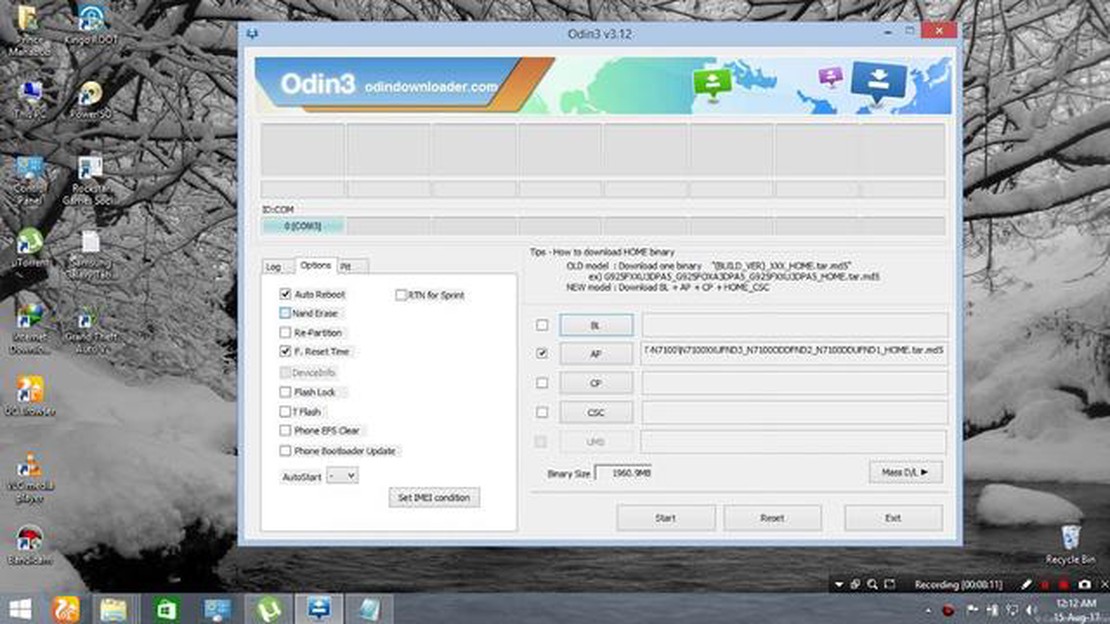
If you are a proud owner of a Samsung Galaxy Note 2 and want to optimize its performance or try out the latest custom ROMs, flashing your device can be a great option. Flashing allows you to install custom firmware, which can provide additional features and customization options not available in the stock firmware.

Table Of Contents

However, the flashing process can be a bit intimidating for beginners. In this step-by-step tutorial, we will guide you through the process of flashing your Galaxy Note 2, making it easier for you to unlock the full potential of your device.

Before we begin, it is important to note that flashing your device will void its warranty. Therefore, it is essential to proceed with caution and make sure you follow the instructions carefully. Additionally, it is crucial to back up all your data before proceeding, as flashing will erase all the data on your device.

In order to flash your Galaxy Note 2, you will need a few prerequisites. First and foremost, you will need a Windows computer, as the flashing tools are compatible with Windows only. You will also need a USB cable to connect your device to the computer, as well as the necessary firmware files and a compatible custom recovery image. Fortunately, all these resources can be easily found online.

Once you have gathered all the necessary resources, you can proceed with the flashing process. This typically involves installing the necessary drivers, unlocking the bootloader, and flashing the custom recovery image. Once the recovery image is installed, you can then proceed to install the custom firmware of your choice.

Step-by-Step Guide to Flashing Your Galaxy Note 2

In this step-by-step guide, we will walk you through the process of flashing your Galaxy Note 2. Please follow the instructions carefully to ensure a successful flash.

Before You Begin:

  • Make sure your Galaxy Note 2 is fully charged or has at least 80% battery life.
  • Backup all important data on your device to prevent any loss during the flashing process.
  • Enable USB debugging on your Galaxy Note 2 by going to Settings > Developer Options > USB Debugging.
  • Download the necessary files for flashing, including the custom ROM and any additional files recommended by the ROM developer.
  • Install the necessary drivers for your Galaxy Note 2 on your computer.

Step 1: Unlock Bootloader

  1. Power off your Galaxy Note 2.
  2. Boot your device into the bootloader mode by pressing and holding the Volume Up + Home + Power buttons simultaneously.
  3. Connect your Galaxy Note 2 to your computer using a USB cable.
  4. Open a command prompt or terminal window on your computer and navigate to the directory where you have the Fastboot tool.
  5. Unlock the bootloader by entering the following command:
    fastboot oem unlock

Step 2: Install Custom Recovery

  1. Download the custom recovery (such as TWRP or CWM) for your Galaxy Note 2.
  2. Copy the downloaded recovery file to the directory where you have the Fastboot tool.
  3. Power off your Galaxy Note 2.
  4. Boot your device into the bootloader mode.
  5. Connect your Galaxy Note 2 to your computer using a USB cable.
  6. Open a command prompt or terminal window on your computer and navigate to the directory where you have the Fastboot tool.
  7. Install the custom recovery by entering the following command:
    fastboot flash recovery recovery_filename.img
  8. Once the custom recovery is installed, use the Volume keys to navigate and the Power button to select options within the recovery menu.

Step 3: Flash Custom ROM

  1. Download the custom ROM for your Galaxy Note 2.
  2. Copy the downloaded ROM file to the root directory of your device’s internal storage.
  3. Power off your Galaxy Note 2.
  4. Boot your device into the custom recovery mode by pressing and holding the Volume Up + Home + Power buttons simultaneously.
  5. Within the custom recovery menu, select the “Wipe data/factory reset” option to perform a factory reset.
  6. Select the “Wipe cache partition” option to clear the cache.
  7. Select the “Install” or “Install from SD card” option, depending on your custom recovery.
  8. Navigate to the ROM file that you copied to the root directory and select it.
  9. Confirm the installation and wait for the process to complete.
  10. Once the ROM is flashed, go back to the main menu and select “Reboot system now” to reboot your Galaxy Note 2.

Step 4: Enjoy Your Flashed Galaxy Note 2

Congratulations! You have successfully flashed your Galaxy Note 2 with a custom ROM. Take some time to explore the new features and customization options that the custom ROM offers. If you encounter any issues or difficulties, you can always revert back to the stock ROM by flashing the stock firmware.

Read Also: Nintendo Switch Gameshare: How to Play a Game on 2 Switch Consoles

Note: Flashing custom ROMs and modifying your device’s software may void your warranty and could potentially damage your device if not done correctly. Proceed at your own risk.

Prepare Your Device for Flashing

Before you begin the process of flashing your Galaxy Note 2, it is important to make sure that your device is prepared properly. This will help ensure a smooth and successful flash, without any unexpected issues or complications. Follow these steps to prepare your device for flashing:

Read Also: GameLoop Download Error Fix: Updated Method 2023
  1. Backup your data: Before flashing your device, it is highly recommended to backup all your important data, including contacts, messages, photos, and apps. This will help you restore your data in case anything goes wrong during the flashing process.
  2. Charge your device: It is essential to have a fully charged battery before starting the flashing process. Make sure your Galaxy Note 2 is charged to at least 70% to avoid any interruptions or battery-related issues during the flash.
  3. Download the necessary files: To flash your Galaxy Note 2, you will need to download the appropriate firmware file and the Odin flashing tool. Make sure to download these files from a trusted source and verify their compatibility with your device model.
  4. Enable USB Debugging: On your Galaxy Note 2, go to the Settings menu, then navigate to Developer Options. Enable the USB Debugging option to allow your device to establish a connection with your computer during the flashing process.
  5. Install USB drivers: To ensure a proper connection between your Galaxy Note 2 and your computer, you will need to install the USB drivers. These drivers can usually be downloaded from the official website of your device manufacturer.
  6. Disable antivirus software: Before starting the flashing process, it is recommended to temporarily disable any antivirus software on your computer. Some antivirus programs may interfere with the flashing process and cause errors or interruptions.
  7. Read the instructions: Finally, before proceeding with the flashing process, carefully read the instructions provided by the developer or the website from which you obtained the firmware file and Odin tool. Familiarize yourself with the steps and requirements to ensure a successful flash.

By following these steps and properly preparing your Galaxy Note 2, you can minimize the risk of encountering any issues or complications during the flashing process. Remember to take your time and proceed cautiously to ensure a smooth and successful flash.

Download the Necessary Tools and Files

Before you can flash your Galaxy Note 2, you will need to download a few tools and files to your computer. Here is a list of what you will need:

  1. Samsung USB Drivers: You will need to install the USB drivers for your Galaxy Note 2 on your computer. These drivers allow your computer to recognize your device when connected via USB cable.
  2. Odin Flash Tool: Odin is a software tool developed by Samsung that allows you to flash firmware and custom ROMs on your Galaxy Note 2. You will need to download and install Odin on your computer.
  3. Custom ROM: If you want to flash a custom ROM on your Galaxy Note 2, you will need to download the ROM file to your computer.
  4. Firmware: If you prefer to flash the stock firmware on your Galaxy Note 2, you will need to download the appropriate firmware file for your device model to your computer.
  5. Backup Files: It is always a good idea to backup your important files before flashing any software on your device. Make sure to backup any important data, such as contacts, photos, documents, etc.

Once you have downloaded all the necessary tools and files, you are ready to proceed with the flashing process.

Flash Your Galaxy Note 2 with Ease

If you own a Galaxy Note 2 and are looking to customize your device and take advantage of the latest software updates, flashing your phone is a great option. Flashing allows you to install custom firmware or operating systems on your device, providing you with more control and flexibility.

Here are some easy steps to help you flash your Galaxy Note 2:

  1. Backup Your Data: Before you start flashing your device, it’s important to back up all your data. This includes contacts, messages, apps, and any other important files you have on your phone. You can use Samsung’s Smart Switch software or any other backup tool to create a backup of your data.
  2. Enable USB Debugging: To enable USB debugging, go to Settings on your Galaxy Note 2, then select Developer Options. Toggle the USB Debugging option to enable it.
  3. Download the Required Tools: To flash your Galaxy Note 2, you will need to download the necessary tools. This includes Samsung’s Odin tool and the firmware or operating system you want to flash. Make sure you download the correct firmware or operating system for your specific model.
  4. Put Your Device in Download Mode: To put your Galaxy Note 2 in download mode, turn off your device completely. Then, press and hold the Volume Down, Home, and Power buttons simultaneously until the device enters download mode.
  5. Connect Your Device to the Computer: Connect your Galaxy Note 2 to your computer using a USB cable. Open the Odin tool that you downloaded earlier.
  6. Flash the Firmware: In Odin, click on the AP button and select the firmware or operating system file you downloaded. Make sure the Auto Reboot and F. Reset Time options are checked. Click the Start button to initiate the flashing process.
  7. Wait for the Flashing Process to Complete: Once you click the Start button, Odin will start flashing the firmware or operating system on your Galaxy Note 2. The process may take a few minutes, so be patient and do not disconnect your device during this time.
  8. Reboot Your Device: After the flashing process is complete, your Galaxy Note 2 will automatically reboot. You can now disconnect your device from the computer.

That’s it! You have successfully flashed your Galaxy Note 2 with ease. You can now enjoy the benefits of a custom firmware or operating system on your device.

Note: Flashing your Galaxy Note 2 may void your warranty and there is a risk of bricking your device if not done properly. Make sure you follow the steps carefully and proceed at your own risk.

FAQ:

Can I flash my Galaxy Note 2 by myself?

Yes, you can easily flash your Galaxy Note 2 by following the steps in this article. Just make sure to carefully read and understand the instructions before proceeding.

What are the benefits of flashing my Galaxy Note 2?

Flashing your Galaxy Note 2 can help improve its performance, update it to the latest version of Android, and even install custom ROMs that offer additional features and customization options.

Is there any risk involved in flashing my Galaxy Note 2?

Flashing your Galaxy Note 2 does come with some risks, such as the possibility of bricking your device if something goes wrong during the process. It’s important to follow the instructions carefully and proceed with caution.

What do I need to flash my Galaxy Note 2?

To flash your Galaxy Note 2, you will need a computer with Odin software installed, the firmware file for your specific device model, and a USB cable to connect your phone to the computer.

See Also:

comments powered by Disqus

You May Also Like