

Fortnite vs Apex Legends: which game is better for a battle for survival?
Fortnite vs apex legends: which one is the best battle royale? In the world of modern computer games, battle for survival has become one of the most …
Read Article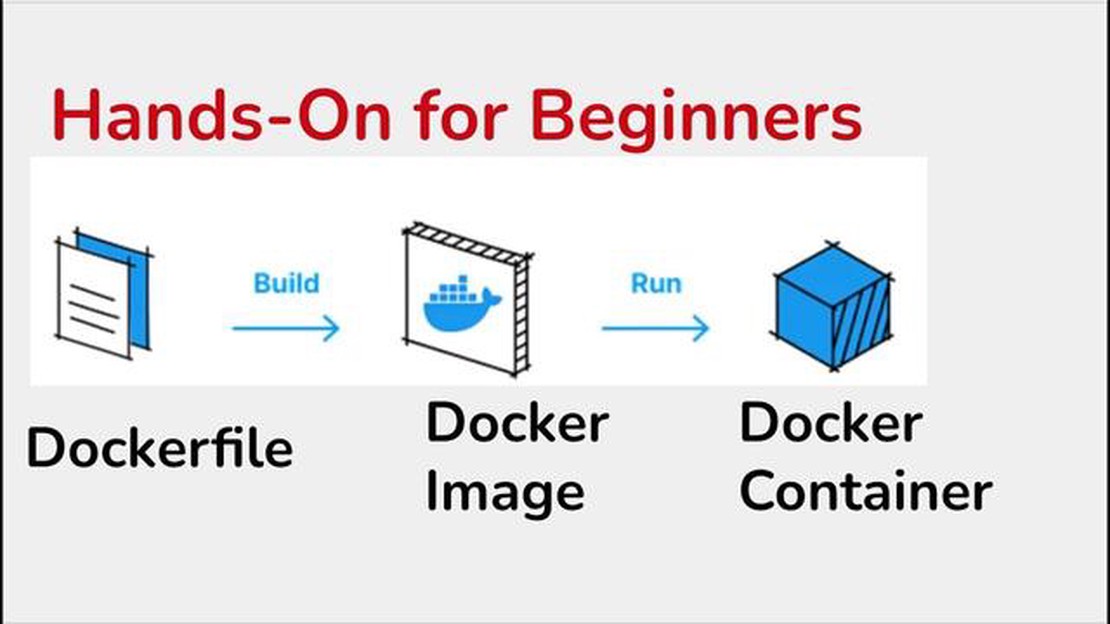
Application development is now one of the most important and popular tasks in information technology. More and more companies and individual developers are facing the need to create and maintain applications on different platforms and in different environments.
One way to cope with this challenge is the use of containerized images. Application containerization allows you to package all the necessary components and dependencies into a single “pod” that can be run on any container-compatible system.
This is very useful because it allows developers to get rid of compatibility issues and simplify the application deployment process. Container images contain everything needed to run an application: the operating system, compilers, libraries, and other dependencies.
In this quick guide, we’ll walk through the basic steps of developing applications using container images. We’ll cover choosing the right imaging tool, creating a Dockerfile, building the image, and running the container. We will also discuss best practices and tips for using containers in application development.
To develop applications using container images, you need to prepare your development environment as well as install Docker.
1. Installing Docker
To get started, you need to install Docker on your operating system. Docker allows you to create and manage the containers in which your applications run.
Installing Docker can be accomplished in a few simple steps:
docker version command in the command line. If the installation was successful, you will see the Docker version information.2. Customizing the development environment
After installing Docker, you need to set up the development environment in which you will build and test your applications. To do this:
Now you are ready to develop applications using container images. Docker provides powerful tools to build, deploy, and scale your applications, easing the development and maintenance process.
One of the main challenges of developing applications using container images is creating and customizing your own container images for developers to work conveniently and efficiently. In this section, we will look at this process.
To create your own container image, you need to create a file named Dockerfile. This file defines the instructions for building the image. For example, you can specify the base image, install the required dependencies, copy the project files, and specify the commands to run the application.
Example Dockerfile:
FROM python:3.8
WORKDIR /app
COPY requirements.txt /app
RUN pip install -r requirements.txt
COPY . /app
CMD ["python", "app.py"]
2. Building the image
To build the image, run the command in the terminal, specifying the path to the Dockerfile:
`docker build -t myapp .``Here -t indicates the name and tag of the image, and the dot indicates the current directory. Docker will build the image by executing the instructions from the Dockerfile.
Once the image has been successfully built, you can start the container using the command:
Read Also: How to compare documents in Google Docs: a detailed guide
docker run -d -p 8080:80 myapp This command starts the container in the background (-d), brushes host port 8080 to container port 80 (-p), and specifies the image name and tag (myapp).
You can use various Dockerfile instructions such as ADD, COPY, RUN, and others to make changes to the container image. For example, you can install required packages or copy configuration files to the container.
A sample Dockerfile with environment configuration:
FROM python:3.8
WORKDIR /app
COPY requirements.txt /app
RUN pip install -r requirements.txt
COPY . /app
ADD config.py /app/config.py
In this example, we add the config.py file to the container image using the ADD instruction.
If the container image has been successfully created and customized, it can be published to a public image registry such as Docker Hub. To do this, register on the platform and run the command:
docker push username/myapp Here username is your username on Docker Hub and myapp is the name and tag of the image.
Read Also: The 10 best apps for teenage girls: an essential piece of jewelry in the tech world
In summary, creating and customizing development container images can greatly simplify and speed up the application development and deployment process.
Developing applications in a containerized environment is a modern approach that allows developers to create and run applications in isolated containers, ensuring uniform behavior and independence from the operating system and environment. This makes the process of application development and deployment much simpler and faster.
Application containerization relies on the use of container images that contain all the necessary dependencies, runtime environments, and components needed to run the application. This allows developers to focus on developing the application itself rather than worrying about configuring the environment and installing dependencies.
One popular tool for working with containerized applications is Docker. Docker provides a user-friendly interface for creating, running, and managing containers. With Docker, you can define and configure a container image that will contain all the components and dependencies required for the application. This image can then be easily deployed to any machine that supports Docker.
The main advantages of developing applications in a containerized environment are:
The Docker environment can be augmented with other tools and technologies such as Kubernetes for container orchestration, or DevOps processes to automate application development and deployment.
Overall, developing applications in a containerized environment offers many benefits that have made it a popular and widely used approach in various domains. Streamlining the development process, increasing resource efficiency, and simplifying application deployment all make containerization an indispensable tool in modern application development.
Testing and deploying applications are an important part of the software development process. With the use of containerized images, these processes can be greatly simplified and accelerated.
One of the main benefits of using containers for application testing is the isolation of the environment. Containers allow you to create virtual environments that completely replicate the environment in which the application will run in a production environment. This enables more accurate and reliable testing and troubleshooting of potential problems before the application is deployed.
Container images also simplify the application deployment process. They can be easily transferred between different environments, making application deployment more predictable and secure. In addition, container images can be rapidly deployed and scaled, allowing you to quickly adapt to changing requirements and environments.
Docker is often used to test and deploy applications using containerized images. Docker provides a simple and efficient way to create, manage, and deploy application containers. It can be used to create and run containers, experiment with different configurations and customizations, and automate application deployment and management processes.
When using Docker to test and deploy applications, the following steps are typically followed:
In conclusion, using container images for testing and deploying applications is an efficient and effective approach to software development. It improves the speed and reliability of testing, enables predictable and secure application deployment, and simplifies application management and maintenance processes.
Container images are lightweight and self-contained packages that contain everything you need to run your applications, including the operating system, libraries, and dependencies. They help simplify the process of application development, delivery, and deployment.
To create a container image, you need to create a Dockerfile, a text file that contains a set of instructions for creating the image. A Dockerfile can contain commands for installing dependencies, customizing the environment, copying files, and more. Once the Dockerfile is created, it can be used with the Docker utility to create the container image.
Developing applications using container images has several advantages. First, it simplifies the development process because container images contain all the necessary dependencies and customizations, eliminating compatibility issues and conflicts between different application components. Second, container images allow applications to scale easily because you can create multiple container instances and distribute the load among them. Third, container images provide application isolation, which allows applications to run on different operating systems and platforms without requiring changes to the application code.
Various tools and technologies are used to develop applications using container images. One of the most popular tools is Docker, a platform for creating and managing containers. Docker allows you to create container images, run them on a host system, manage them, and scale your applications. Kubernetes, a container orchestration platform that automates the deployment and management of containers, is also commonly used. In addition, a diverse set of tools such as programming languages (e.g., Java, Python, or Go), frameworks (e.g., Spring or Flask), and tools for building and managing dependencies (e.g., Maven or Gradle) can be used to develop applications using container images.
Fortnite vs apex legends: which one is the best battle royale? In the world of modern computer games, battle for survival has become one of the most …
Read Article
Valorant Riot Games has done it again with their latest release, Valorant. This new first-person shooter game has taken the gaming world by storm and …
Read Article
How To Fix Can’t Answer Calls In Android | Calls Not Working Every Android user has encountered the frustration of not being able to answer a call at …
Read Article
Learn apps for learning defense mechanisms to improve your mental health. Mental health is one of the most important aspects of our lives. It affects …
Read Article
8 Best DirecTV Now Alternative in 2023 In recent years, streaming platforms have become increasingly popular as an alternative to traditional cable …
Read Article
8 reliable platforms to host discord bots. Discord bots are becoming increasingly popular and in demand in online gaming communities, communication …
Read Article


